Practices which have the Billing Module and Patient Portal enabled can use the MYIO Billing functionality.
Balances in MYIO
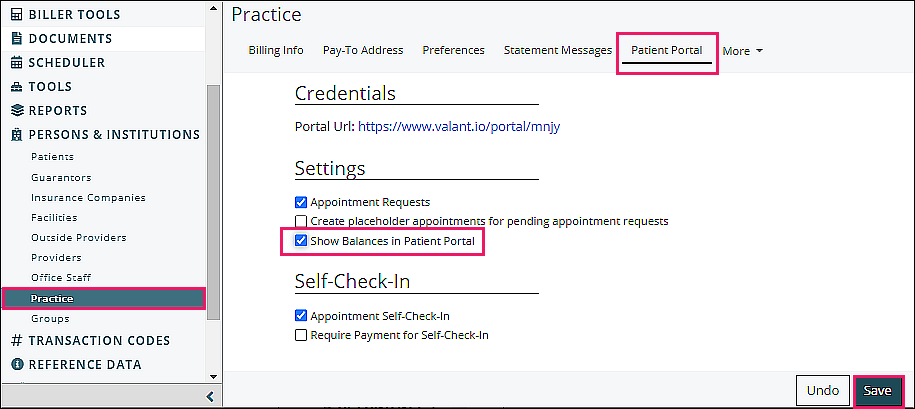
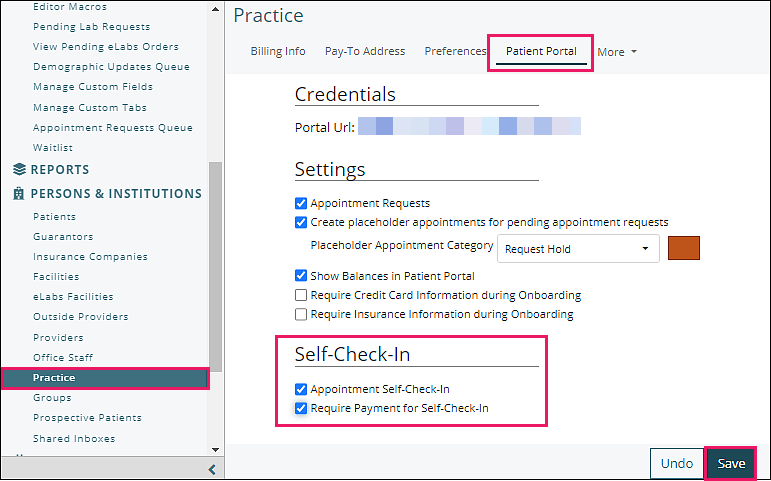
Practices can allow patients to view their balance in MYIO. This can be configured at the practice level and per patient to only show certain patients. The practice setting must be turned on by a user with Admin Access Permission. This is done on the Persons & Institutions | Practice | Patient Portal tab | Select the "Show Balances in Patient Portal" checkbox.
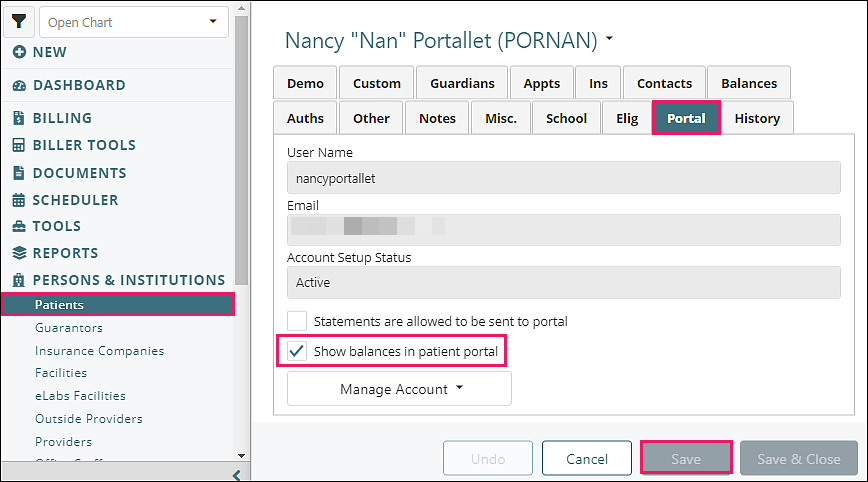
Once configured to show at the practice level it needs to be set for the patient. This can be done when the MYIO account is created, or at a later date.
To show balances in the patient portal:
- Navigate to Persons & Institutions | Patients | select patient | Portal tab
- Click "Show balances in patient portal" checkbox, then click Save
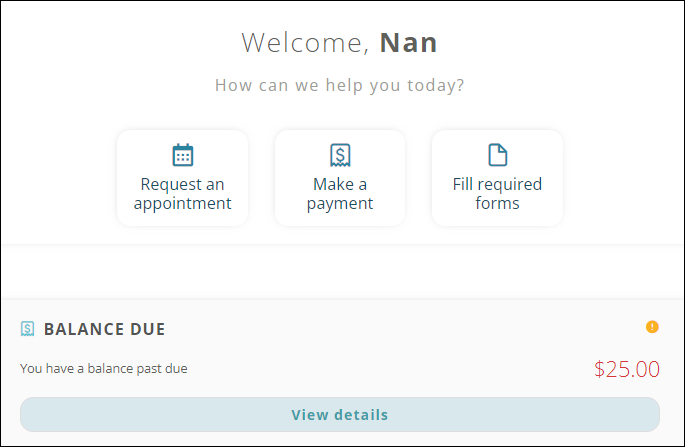
If the patient has a balance that is in patient responsibility then they will see their balances in the Balance Due section of MYIO. These balances will update as payments are posted or the balances change. If the practice has custom statement messages that go out based on aging date range then those will also appear in the portal as well below the balances grid.
Sending Statements and Guarantor Summaries in MYIO
Create a Patient Statement or a Guarantor Summary
Click Billing | Create Patient Statements
Leave all the filters blank if statements for all patients need to be created. Use the filters to select more specific patients or date ranges, if needed.
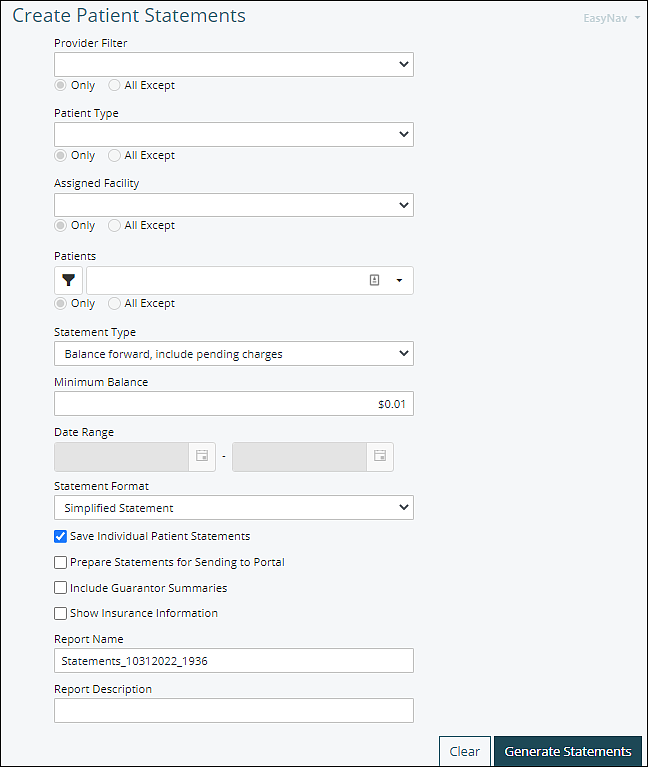
Open the "Statement Type" drop down menu and choose one of the following four options:
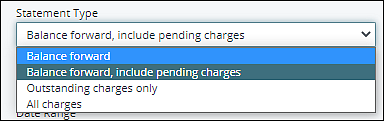
- "Balance forward" will show all billing transaction details from the last 30 days or since the last time the patient was sent a Balance forward statement, whichever is greater. Additionally, it will display the total patient responsibility from the previous Balance forward statement as a single line item at the top, but will not include visits that are still pending insurance processing.
- "Balance forward, include pending charges "will display the same information as the Balance forward statement type, but includes pending insurance visits.
- "Outstanding charges only" will only print charges that have a balance remaining, whether it is insurance or patient responsibility.
- "All charges" will generate a statement that shows the entire account history for the patient within the selected date range.
Use the "Minimum Balance" selection to set the patient responsibility as a minimum dollar amount, or bottom limit, on statement generation. E.g. If you do not wish to send statements for balances less than $5.00 dollars, enter that amount here. To generate statements for all of the charges, even those with a zero balance, change this amount to $0.00.
Note: The "Save Individual Patient Statements" checkbox is selected by default because it is required in order to create Guarantor Summaries.
Select "Prepare Statement for Sending to Portal" and "Include Guarantor Summaries" (if needed)
Click Generate Statements
Single Patient Statements
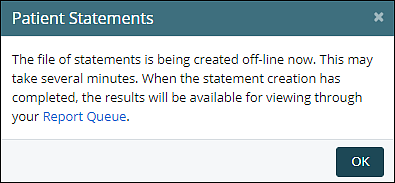
If only one patient was selected a second tab will open a preview of the the statement and allow it to be opened with Adobe Reader or saved locally as a .PDF file. The following language will appear on the Create Patient Statements tab:
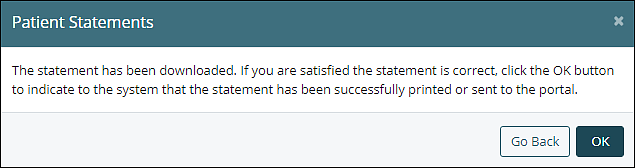
An acknowledgement appears after clicking OK.

A copy of the statement will be added to the Documents tab in the "Patient Chart" and the patient will receive an email notification between 9 a.m. and 8 p.m. that a statement has been delivered to their MYIO account.
Multiple Patient Statements
If multiple patients were selected in "Create Patient Statements", the following pop up window will appear after clicking Generate Statements.
Click on Tools | Report Queue
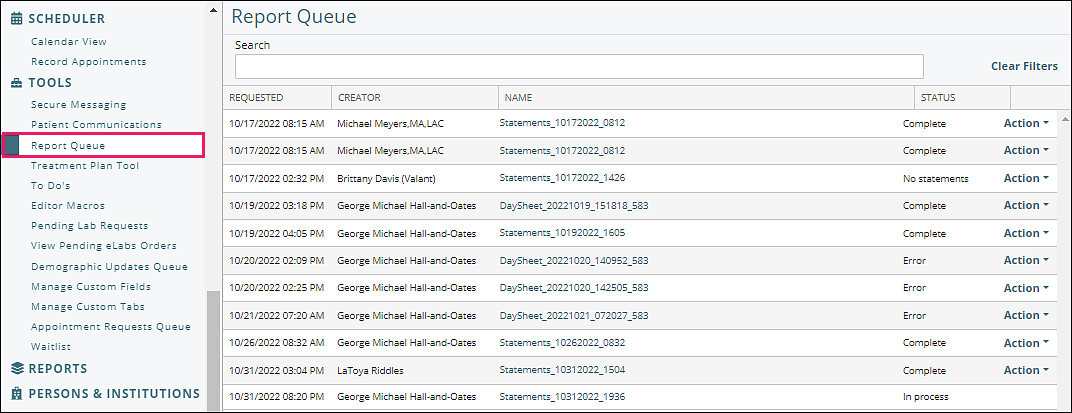
In the example above, the files are sorted in ascending order according to the "Requested" column, so the newest report is at the bottom.
Note: If the "Report Queue" tab was opened prior to clicking Generate Statements on the "Create Patient Statements" tab, be sure to click on the Refresh button in the upper right corner of the "Report Queue" tab.
There are three possible status that can show in the Report Queue. If the Status is "Scheduled" that means the server is compiling the data, and after a few moments the Refresh button should show "In process". If the Status is "In process", periodically click the Refresh button in the upper right corner of the tab until the status is "Complete". If the status is "Complete", select the "Action" drop-down menu. If the "Prepare Statements for Sending to Portal" checkbox was NOT selected in "Create Patient Statements" prior to clicking Generate Statements, the following options will be available in the Action drop-down list: 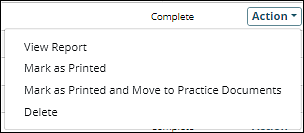
If the "Prepare Statements for Sending to Portal" checkbox was selected in "Create Patient Statements" prior to clicking Generate Statements, the following options will be available in the Action drop-down list for the file on the "Report Queue" tab.
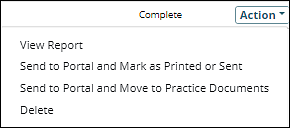
When "Send to Portal and Move to Practice Documents" is selected, the following will occur:
- A .PDF file of the statements will be added to Practice Documents
- The same items that are listed under Send to Portal and Mark as Printed or Sent
MYIO Self-Check-In Prerequisite – Paywall
The "Require Payment for Self-Check-In" (Paywall) setting in Persons & Institutions | Practice | Patient Portal allows practices to require patients to meet their patient responsibility (eg. copay or appointment charge) before checking in for an appointment through MYIO. The patient will be able to check in if there is a credit on file greater than the copay or appointment charge. If the patient responsibility for the appointment is greater than the patient credit on file, the patient will be required to pay the difference before checking in.
The “Self-Check-In" feature allows patients to notify providers when they are ready to join a telehealth session. The “Paywall” feature will help practices collect the patient responsibility for an appointment before it has occurred.
Users can turn on the feature in Persons & Institutions | Practice | Patient Portal | Require Payment for Self-Check-In. This is available to all customers with MYIO and when turned on is active practice-wide for all patients.
Enabling the feature:
In Persons & Institutions | Practice | Patient Portal make sure both of the Self-Check-In settings are enabled.
- Appointment Self-Check-In
- Require Payment for Self-Check-In
Patient steps and view:
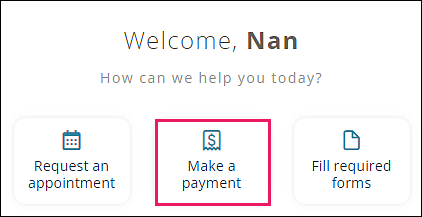
1. Log into the patient portal
2. Click the “Check-In” button for the appointment.
Note: The portal only shows appointments for today and the future. The “Check-In” button only appears for today’s appointments.
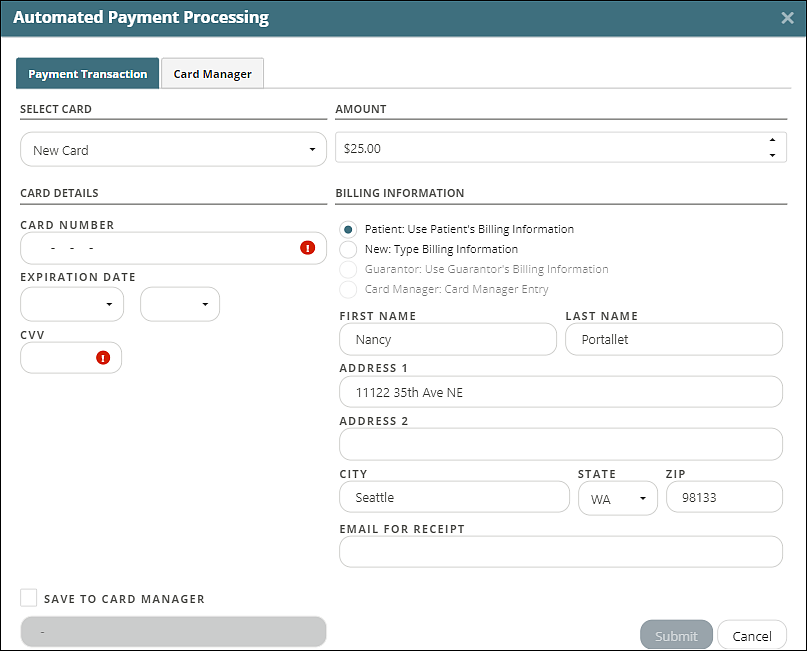
3. If there is a dollar sign icon, clicking the Check-In box will open the automated payment processing window.
4. Enter payment information and click Submit.
5. Successful submission of payment will check in the patient and notify the provider.
Provider steps:
1. Receive notification that patient has successfully checked in.
2. Click “Initiate Telehealth” in the check-in notification or by right-clicking on the appointment in the Scheduler.
Self-Check-In Prerequisite FAQs:
What is the patient financial responsibility for the appointment?
If the patient has active Insurance 1, the patient responsibility is the copay. This is displayed in the appointment hovertip or the patient tab within the appointment.
If the patient does not have active insurance, the patient responsibility is the full appointment fee.
Where do I see if the patient has an unapplied payment?
The information can be found in any or all of these locations.
- Total patient balance (should not be negative). Billing | View / Edit Charges
- Prepayment. Billing | Prepayment History
- Unapplied Portal Payments. Billing | Apply Portal Payment
- Receipt Book. Billing | Receipt Book
I’ve checked the “Require Payment” setting and my patient has a copay – why are they able to check in without making payment?
The patient may have a payment on file that meets their appointment responsibility. Check the prepayment page, unapplied portal payments page, or the Receipt Book (if this is enabled for your practice) to see if payments need to be applied to the patient’s balance.
If there is a copay exception built that overrides the default copay listed in Persons & Institutions | Patients that amount can be different than the original copay.
If the appointment has no associated treatment code, there is no payment requirement.
DeleteOnline Bill Pay through MYIO
Online Bill Pay allows patients to submit a credit card payment through MYIO. Practices can then apply the patient’s payment to one or more date of service or convert the payment to a prepayment. In order to use Online Bill Pay, practices must have the Patient Portal Module, Valant's integrated payment processing, and the Online Bill Pay Module enabled. Users must have the "Easy Billing" permission enabled to access the "Apply Portal Payment" page.
Patient Perspective
The patient will log into MYIO and click Make a Payment on the welcome screen which will open the “Automated Payment Processing” window.
The window allows the patient to enter their credit card information, the amount they want to pay, and can check the “Save to Card Manager” box to store the credit card for later use. If the card is stored through MYIO than the practice will be able to access the charge to charge and credit the card. They will also be able to edit all details of the card, except for card number and CVV. Patients will also have access to the “Card Manager” but they can only see cards saved via MYIO. Cards entered in the EHR from the practice will not be accessible via MYIO. This is to protect information that was potentially given by someone other than the patient (i.e. guarantor, divorced parents, etc).
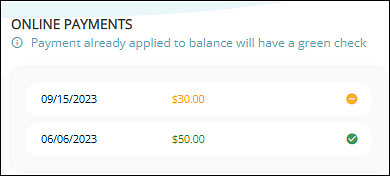
After successful payment the patient will see a new row added to the “Online Payments” grid displaying the payment date, amount, and a status icon on the billing screen.
Browser View
Mobile App View
 |
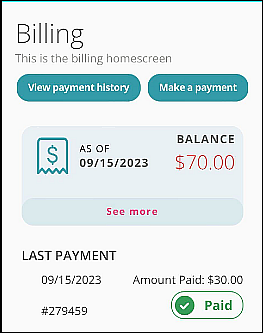 |
The applied to balance will show a yellow pending icon until the practice manually applies the payment. Applied payments show a green paid icon. Patients cannot select where the balance is applied. When a patient submits a payment, their card will be charged but their balance will not be updated until the practice manually applies the payment. The patient may need to refresh the page to see the processed payment.
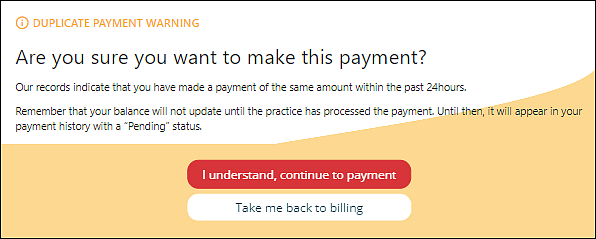
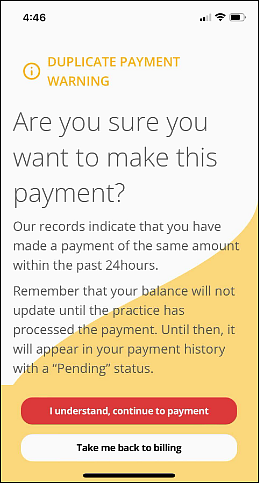
If a patient attempts to make a duplicate payment, they will see a warning window.
Browser View
Mobile App View
The patient will receive an email receipt of the transaction if the "Email for Receipt" field is completed.
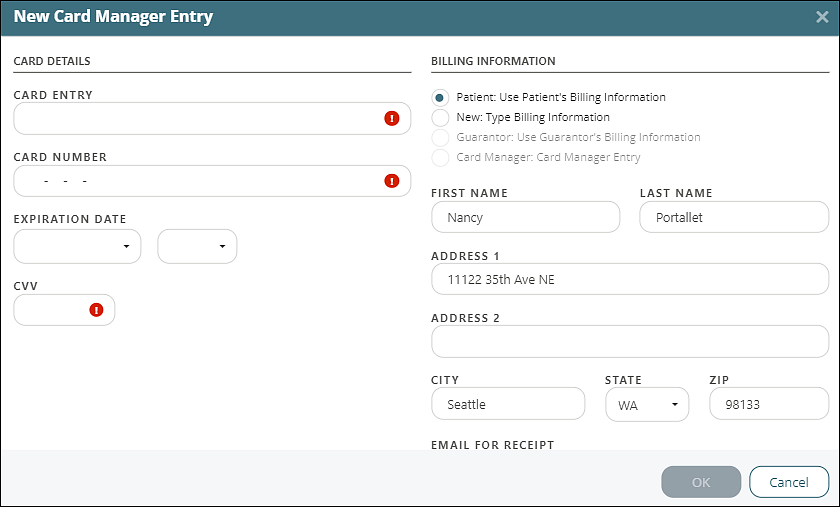
Saving a Card without a Payment
Practices that would like patients to have a card on file without accepting a payment can have patients access the "Billing" link in the top of their MYIO welcome screen. The bottom of the page they will see the Card Manager. They can click + Add New Card to open the "New Card Manager Entry" window.
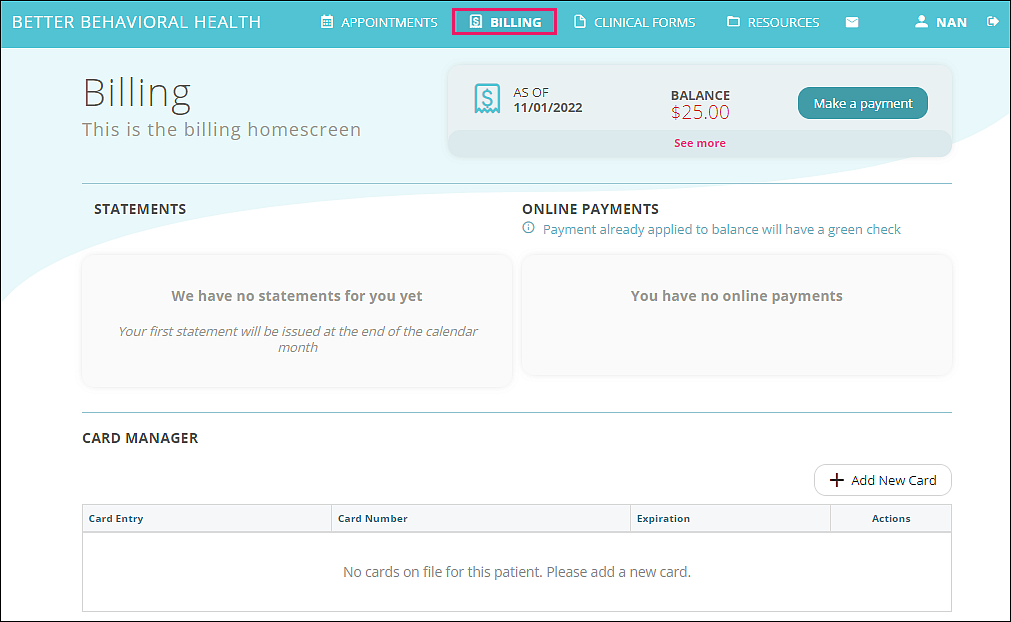
The "New Card Manager Entry" has patients enter card details to save the card for the practice to charge at a later time. When a card is added by a patient the practice will see it in the Card Manager on the Persons & Institutions | Patients | Balances tab.
Practice Perspective
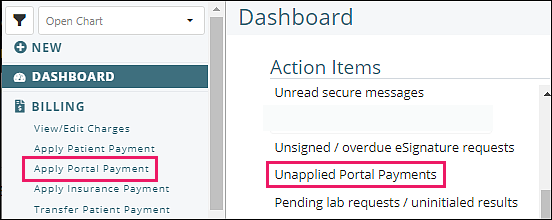
In the EHR there is an Action Item called “Unapplied Portal Payments”. Clicking the action item will take the user to the “Apply Portal Payment” page. Users can also access the page by selecting Billing | Apply Portal Payment from the navigation menu.
This screen will show a list of all unapplied portal payments and their specific details. Payments made through MYIO are not attached to any specific visit. It is at the discretion of the practice how to apply those payments.
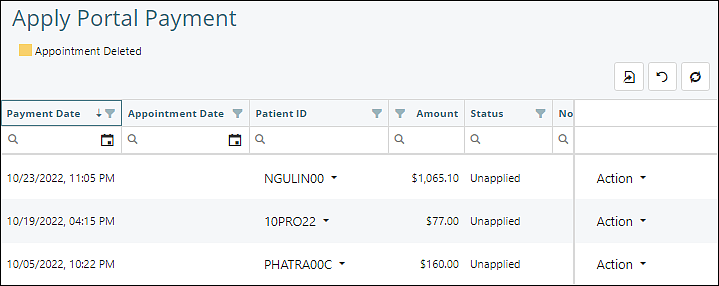
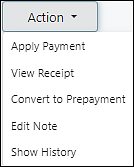
Users should click the “Action” drop-down to apply the payment, view a receipt, convert to prepayment, edit the note or view a history of the payment and any edits. Converting a payment to pre-payment will change the "Applied to Balance" field in MYIO to say "Yes". When Apply a Payment is selected it will take users to the Apply Patient Payment and require the same workflow as applying a patient payment.