
The Electronic Remittance Advice (ERA), or 835, is the electronic transaction that provides claim payment information. These files are used to auto-post claim payments into Valant.
The Easy Billing Permission is required for ERA access.
ERA Payment List Navigation
Click on Billing | ERA | ERA tab to access ERA files delivered by a partnered clearing house or uploaded from other third party clearing houses.
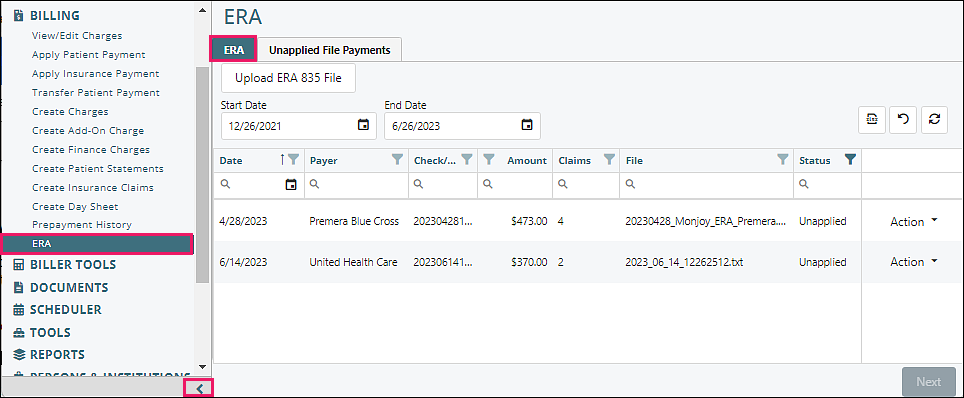
The first screen shows the list of ERAs which are imported from the integrated clearinghouse daily, or manually added if not using an integrated clearinghouse. There are several navigation tools on this screen.
Due to the amount of data displayed on the ERA screens, it is recommended to minimize the left navigation list by clicking the arrow at the bottom of the list.
Upload ERA 835 File
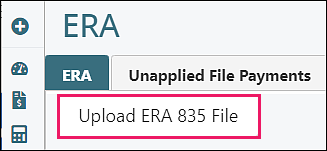
The “Upload ERA 835 File” button enables uploading an ERA file from a third party clearinghouse. The file must be in the 835 format. Click Browse to select one or more multiple files from the computer, or the file can be clicked on and dragged into the box.
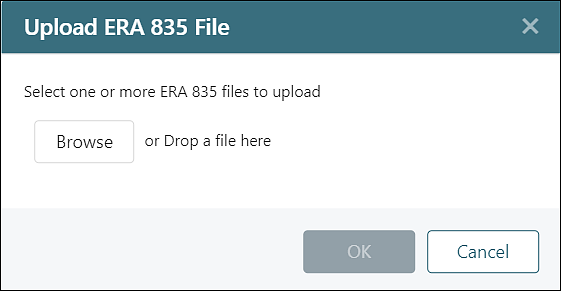
Once the file is in the box click OK.
Note: An ERA may have a file extension such as .txt, .dat, .x12, or .835, which contains text and computer code in a standardized format to aid processing by billing software. An ERA file is not a PDF or Excel spreadsheet, although the correct software can process the data and export it, if needed, in these or other formats.
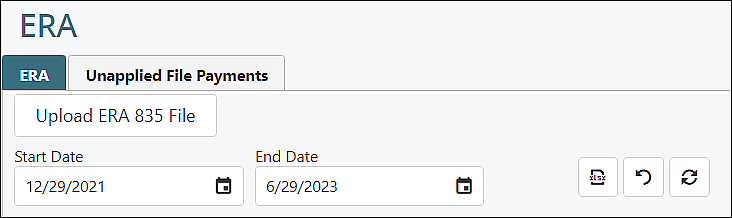
Start and End Dates
Start Date / End Date Fields: filters ERA files by date received
Start and End Date are determined by the default months of payments in the System | Preferences | User Preferences tab. Choosing a shorter period will speed the loading of this page.
Note: The Check/EFT date may be included by some payers for future dates, and will not immediately appear unless the end date is extended to include future dates.
Top Right Icons
 |
Exports the current view to an Excel spreadsheet |
| Removes all filters that have been set for any field | |
 |
Refreshes data if any changes were made |
Note: The "Export to Excel" button is a valuable reporting tool for reconciling deposits received in your bank account with the ERAs that are imported into Valant.
Column Header Format
The columns can be reordered by clicking on the header and dragging it to another position. This order will be saved, as long as the same browser is used, and cache has not been cleared in the browser.
Data can be filtered by clicking on the filter icon next to the column name.
A drop box will appear that contains all of the options listed in the ERA page. Selecting a checkbox will filter only data that matches the selected item.
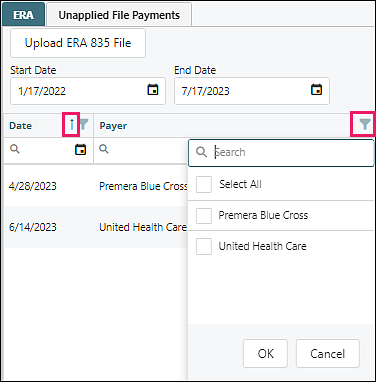
Data can also be reordered by clicking on the header. An arrow will be displayed that will indicate the order the data is listed in. Clicking on the header again will reorder the data and the arrow direction will change.
Column Headers

- Date: date of the ERA
- Payer: the insurance company that is paying the claims
- Check/EFT #: check or EFT number that identifies the payment
- Amount: amount of the total payment
- Claims: number of claims in the file
- File: file name provided by the payer
- Status: identifies if the payment has been applied or is still unapplied
- Applied: the ERA has been applied by the practice
- Unapplied: the ERA has not been applied by the practice
- Bypassed: ERA manually skipped by the practice
- Parsing: Valant preparing file to process
- Processing: Valant processing the applied ERA
Action drop down options: 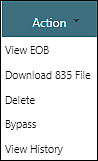
- View EOB: displays the full EOB in a PDF
- Download 835 File: allows you to download the 835 file
- Delete: deletes the file (can only delete a manually uploaded file)
- Bypass: keeps the file but does not post it. This can be reversed if it is discovered that the file needs to be posted
- View History: tracks the activity of the ERA
Posting ERAs
Highlight the ERA and click Next to begin posting ERA payments.
Valant matches ERAs to insurance companies by using the payer's Tax ID. If the Tax ID for the payer is not listed in Persons & Institutions | Insurance Companies, a box will appear with a list of the insurance companies to choose from. Checking the box next to the desired insurance company will automatically add the Tax ID to the insurance in Persons & Institutions | Insurance Companies and allow the process to continue.
ERA Tabs

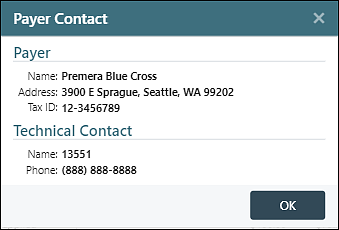
- Payer Contact: displays the payer, address, Tax ID, and phone number
- Denials Report: if the ERA contains any denials, they will be displayed in this report
- View EOB: displays the full EOB in a PDF
- Exceptions Report: if the ERA file has a claim that Valant cannot find, this report will display the content of the claim for each patient
- Download 835 File: this process will download the ERA that was received/uploaded from the clearinghouse
- View Provider Adjustments: this information displays any adjustments made at the provider level rather than the claim level. If the file has a provider level payment, a pop-up will appear when you access the payment. Most often these payments are interest payments made by the insurance company for a delay in payment
ERA Top Fields

- Payment Date: the date of the payment
- Payment Type: shows how the payment was made to the practice
- Check/EFT Date: Date of the Check or EFT
- Payer: Insurance Company
- Check/EFT #: number identifying the payment
- Payment Amount: total payment amount.
- Applied Amount: total amount that can be applied
- Unapplied Amount: total amount that cannot be applied
- Provider Level Adjustments: payment amounts that are at the provider level and not at the claim level
- Select: allows you to review and adjust reason codes filtered by reason codes
- Expand All: opens all payments to view the adjustments
- Collapse All: closes the adjustments for each payment

- Yellow: means the payment will need some follow up. View the information in the Needs Attention column for more information
- Pink: means that the balance after the payment is posted will be a negative balance
Icons on far right
 |
Exports the current view to an Excel spreadsheet |
 |
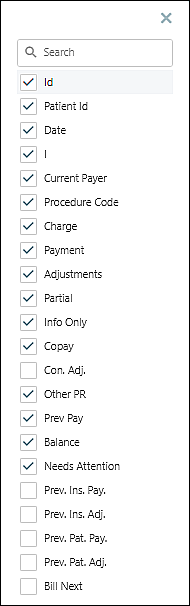
Provides a list of columns that can be displayed. Unchecking or checking the box to the left of the desired column name will indicate if the column will be viewed on the screen. To optimize the view it is recommended that only columns used should be displayed/checked |
| Removes all filters that have been set for any field |
Column Headers

The columns can be reordered by clicking on the header and dragging it to another position. The column widths can also be changed by selecting the line of the column and dragging it to the preferred size. These changes will remain with each user as long as the same browser is used and the cache is not cleared on the browser.
Data can be filtered by clicking on the filter icon to the right or left of the column name.
Column Descriptions
- Selection State: the selection state allows you to apply the payment or leave the payment as unapplied
- Apply: will post the payment to the appropriate claim in the patient’s View/Edit Charges
- Unapplied: will allow the ERA to be posted without this payment applying to any claim
Note: Unapplied occurs mostly when old system payments are on the ERA and Valant has no way of matching the payment to a visit.
- ID: represents the claim that the payment is to be posted to. The ID is the Prim ID listed on the correlating Transaction Code in the patient’s View/Edit Charges.
- Patient Id: identifies the patient by the system patient ID
- Circled N Icon: note in Persons & Institutions | Patients
- Alert Icon: Persons & Institutions | Patients notification clickable link
- Date: the date of service for the claim
- I (Claim Status Code): this X12 status code conveys the status of a specific service line
- Current Payer: the insurance that is listed on the claim in View/Edit Charges. The number in parenthesis represents the insurance order for the claim. (1) Primary, (2) Secondary, and (3) Tertiary
Note: If the current payer’s name is bolded, this is an indicator that the tax ID of the insurance on file for this patient does is not synced correctly. Contact support to assist and DO NOT process the ERA.

- Procedure Code: the transaction code that is being paid.
- Charge: the amount billed for the transaction code.
- Payment: the amount paid by the insurance company.
- Adjustments: the total amount adjusted by the insurance company. All CO adjustments from the payer.
- Partial: when checked, keeps the balance with insurance to allow for follow up with the insurance prior to making the balance patient responsibility. This is used for denials that need follow up. If the box is not checked on a denial, the balance will move to the patient responsibility.
Note: If the payment line is $0 or a denial, and the practice is contesting or resubmitting the claim, partial should be checked.
- Info Only: this field defaults to N (N means NOT info only). A Y indicates that one of the insurance adjustment codes has been marked “information only”. This box is edited by selecting the right facing arrow at the beginning of the payment line to reveal the editable information.
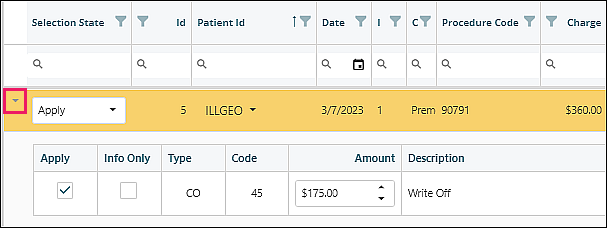
- Copay: this is the copay that the insurance company has assigned as the patient responsibility
- Con. Adj. (Contractual Adjustment): insurance adjustments per contract with payer (CO-45)
- Other PR: is any patient responsibility assigned by the insurance other than the copay
- Prev Pay: sum of all the patient and insurance payments and adjustments that have already been paid towards the balance
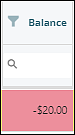
- Balance: represents what the balance of the claim will be after the payment is posted
Note: Any negative balance will be pink and should be reviewed to avoid incorrect credits on the account
- Needs Attention: this column will identify any issue that will require attention following the payment being posted. To investigate issues, use the Show Details window described below in the Action Items list. Issues that may be identified:
- Unknown Payer
- Denied as Duplicate
- Reversal
- CPT is Different
- Claim Details are Different
- Copay is Different
- Fee Schedule Con Adj is Different
Example: Copay is Different – indicates that the copay that is in the system is different than what the insurance is stating. The follow up required would be to update the copay amount in the patient’s Demo tab to the amount indicated on the ERA.
- Previous Insurance Paid: amount paid by insurance prior to this payment
- Previous Insurance Adjustment: amount adjusted by insurance prior to this payment
- Previous Patient Payment: amount paid by patient prior to this payment
- Previous Patient Adjustment: amount adjusted for patient prior to this payment
- Bill Next: represents who is responsible for the remainder of any balance due following this payment. If there is a secondary insurance on file, the system will set the visit as pending insurance for the secondary insurance on file and turn the visit in View/Edit Charges yellow.
Action
Clicking the downward facing arrow next to "Action" will provide you with two options.

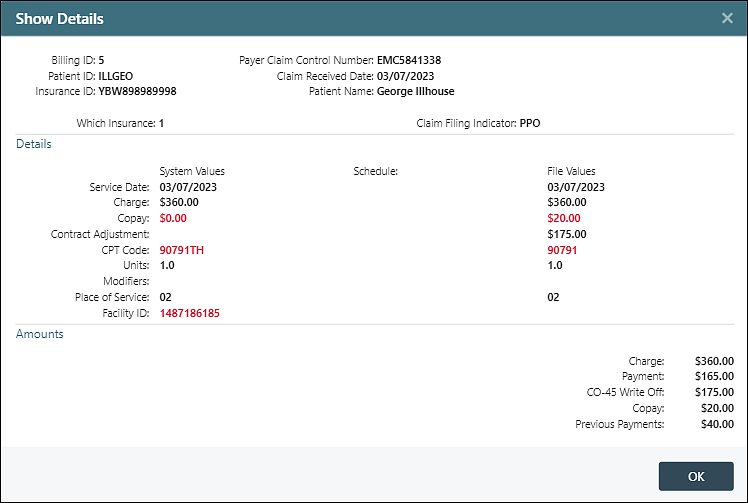
"Show Details" provides you with a detailed look of the system information and the values represented in the ERA. Values on the left are sourced from the charge in View/Edit Charges. Values on the right are sourced from the ERA. Items shown as red indicate the values are different between the charge and the ERA.
"Match Manually" allows you to search for the patient and visit in the event that it is listed as unapplied and the claim is in Valant.
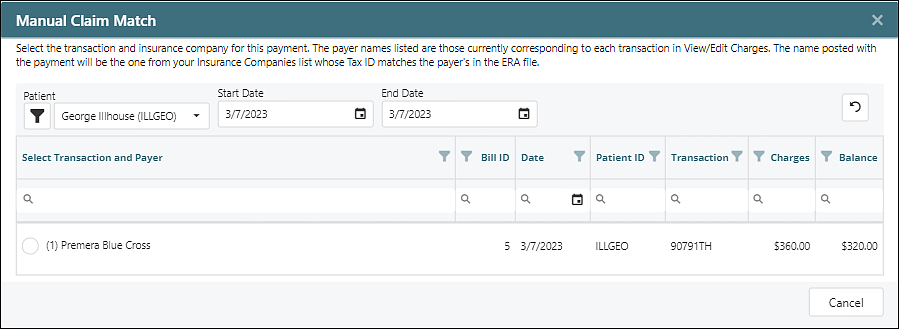
Selecting the patient will pull up the transactions to choose from. Choosing the radio button next to the claim that correlates with the ERA will match the payment with the appropriate claim.
Bottom of Page Button Options

- Back: returns to the ERA list window. This will need to be done if you do not want the payment to be locked to your user
- Reset to Original: returns the ERA to its original state
- Undo Changes: reverses the last change that you made to the ERA
- Save Changes: saves what has been completed in the event that the full ERA is not ready to apply
Note: This page does not autosave. Manually save regularly when working through large ERAs.
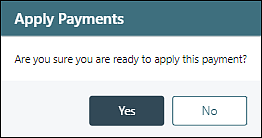
- Apply Payments: After ERA has been reviewed and the payment is ready to apply to each claim, select the Apply Payments button in the bottom righthand corner of the window. A window will appear stating “Are you sure you are ready to apply this payment?” Clicking Yes will distribute the payment to each claim in View/Edit Charges.
Note: After clicking “Apply Payments” the system will begin processing the ERA in the background. On large ERA files, it may take several minutes to process, and the posting status can be reviewed in the Status Column (described above).
Delete