
The following instructional sections are designed to ensure a practice has a successful billing set up. Starting in order from top to bottom will provide you with an efficient workflow. Each section will outline the required fields for insurance claims submission.
Practice Setup
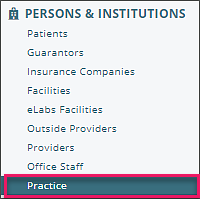
For users with the Admin Access, the "Practice" page found under Persons & Institutions | Practice allows users to change settings for the practice. Please note that based on your practice's configuration options may look slightly different than images in this article.
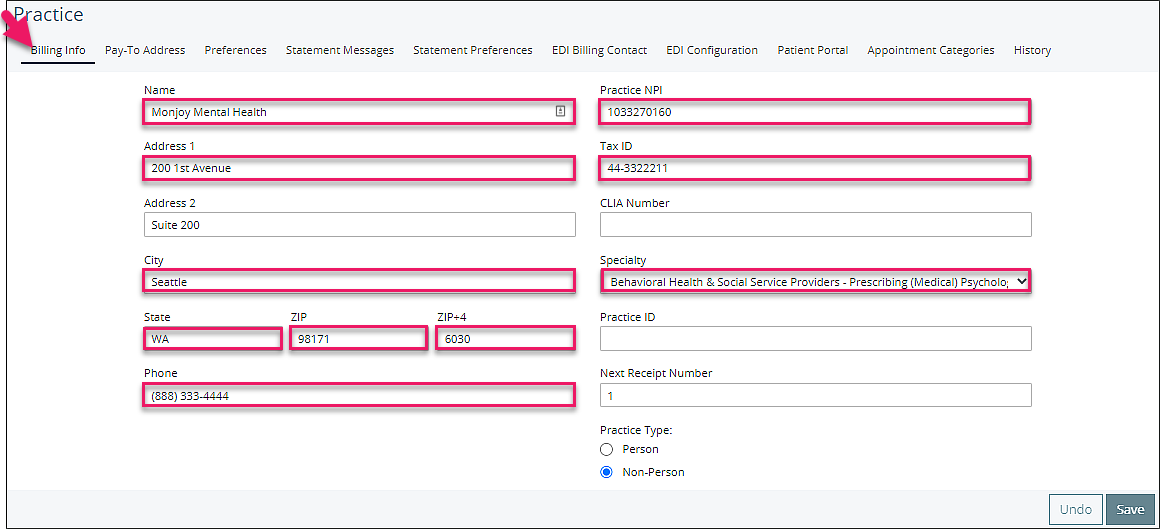
Billing Info Tab
This view provides practice billing information that will be used for billing information like claims and where the practice will be billing. Be sure to populate the ZIP+4 field. The Specialty field links to the taxonomy code. See List of Taxonomy Codes article for more detail. Practice Type determines whether the claims are submitted under a Practice NPI (Non-Person) or under the provider NPI (Person).
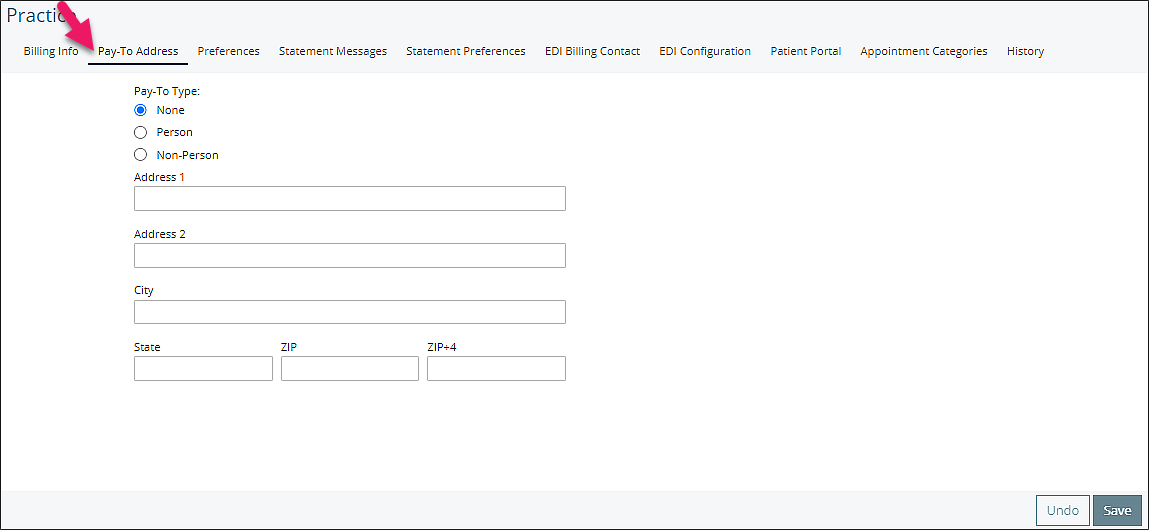
Pay-To Address Tab
The Pay-to Address should be completed only if payments will be made to a address different than the practice address.
Preferences Tab
The Billing section in the Preferences tab allows users to set practice wide settings for Billing. Your practice will most likely use the default settings in this section.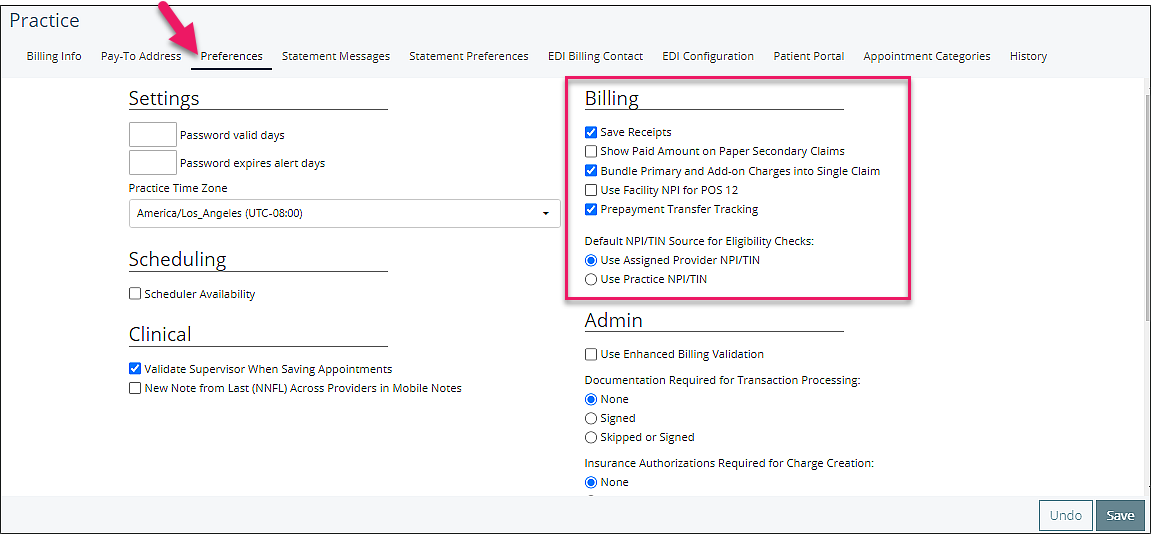
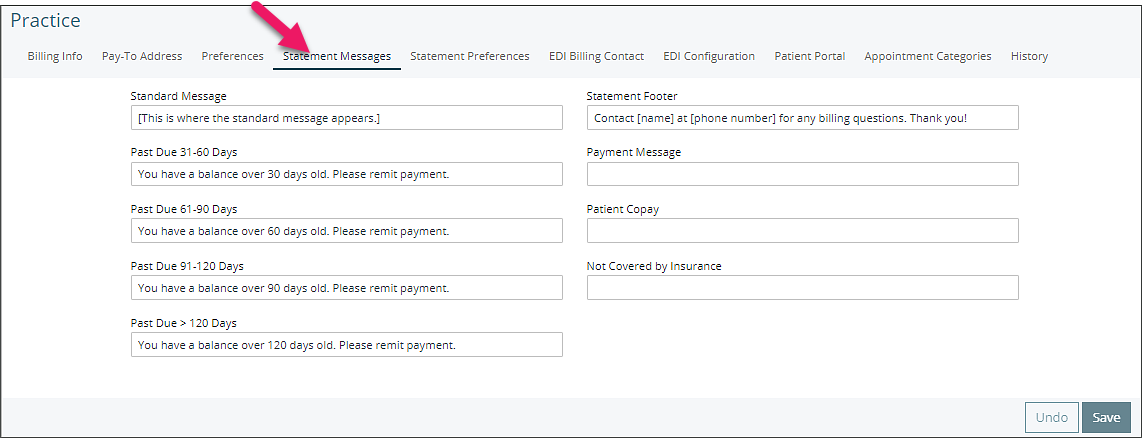
Statement Messages Tab
The Statement Messages tab allows practices to customize their statements based on the age of the balance and other text fields to be printed on statements.
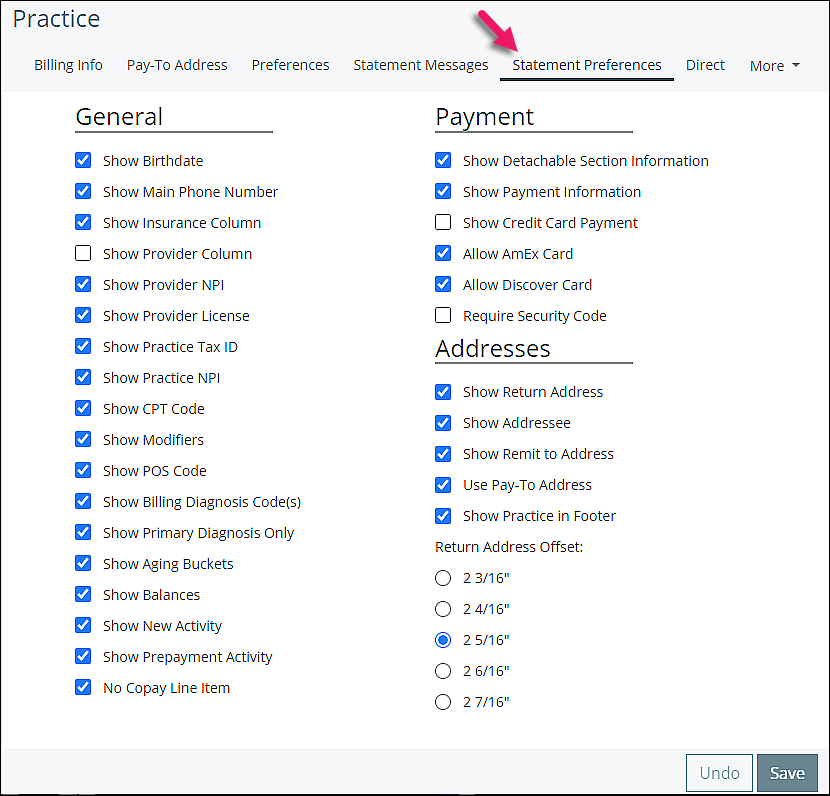
Statement Preferences Tab
The Statement Preferences tab allows custom configuration of a practice's statements, and what information will appear. This page also allows for the creation of Superbills.
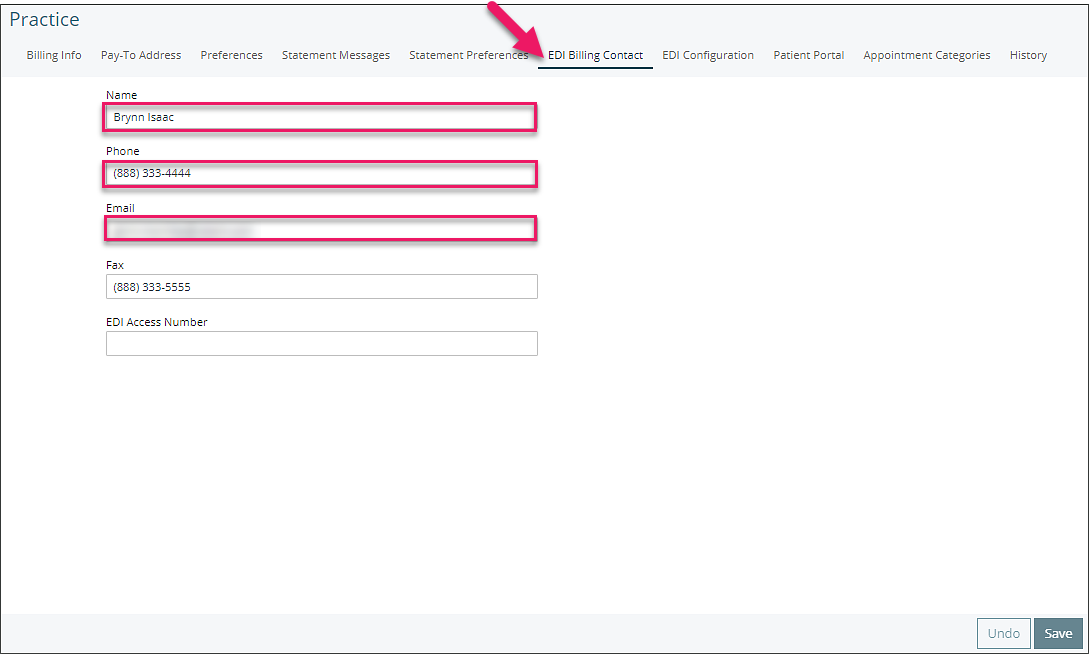
EDI Billing Contact Tab
For electronic billing the EDI Billing Contact is submitted with claims and provides the payer with contact information for someone at the practice. Only the name and phone or email field is required.
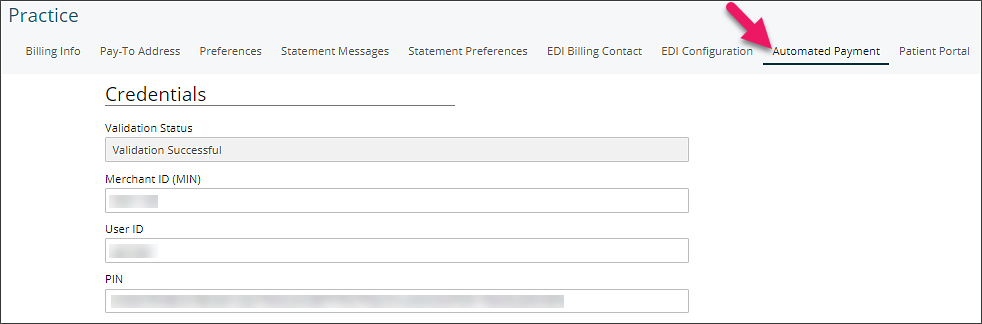
Automated Payment Tab
The Automated Payment tab most likely is not visible for your practice. This tab is where Valant will configure your practice credit card processing credentials. Please do not edit any details on this page. Valant will receive and input your credit card processing credentials. Editing this information can prevent your practice's ability to process credit cards in Valant.
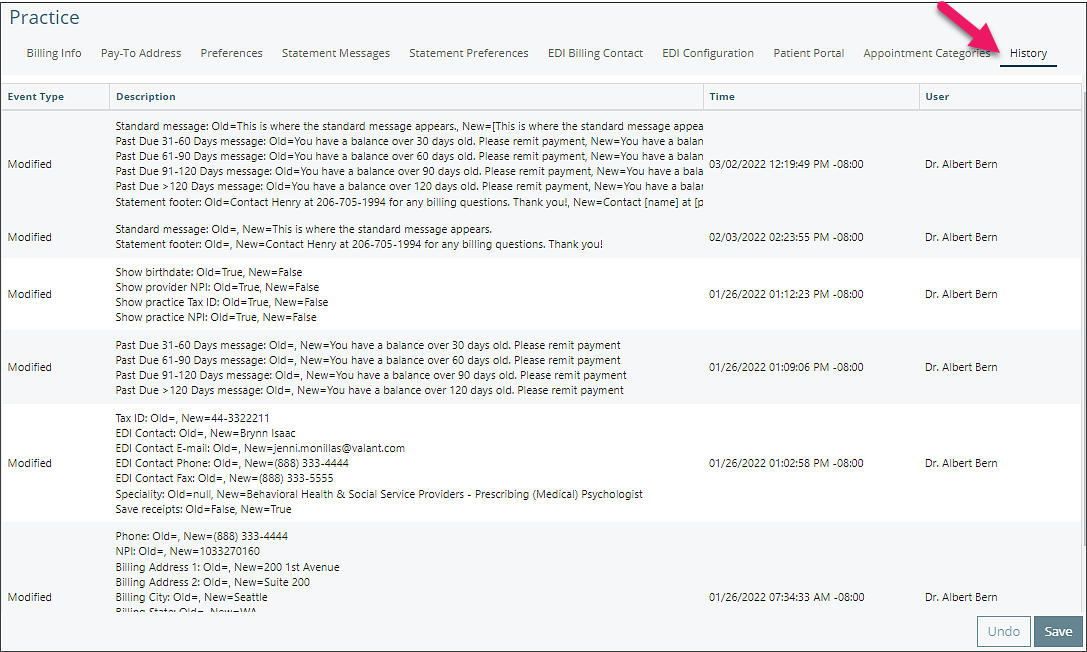
History Tab
The History tab will show an audit log of history for the "Practice" page and show each time a change is made.
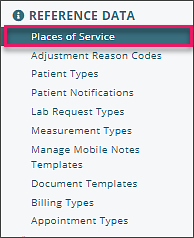
Places of Service Setup
Place of Service Codes are two-digit codes placed on professional claims to indicate the setting in which a service was provided. CMS maintains POS codes used throughout the healthcare industry. In Valant, Places of Service can be added and maintained under Reference Data | Places of Service.
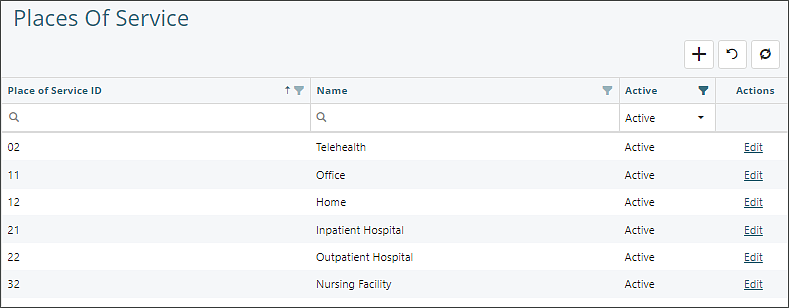
This page allows users to add and edit existing places of service. Users can use the filters to search or sort columns to help find a specific place of service if the list is longer then the page.
Adding a Place of Service
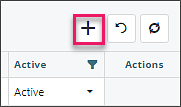
- Click the "+" button to add a row.
- Complete the "Place of Service ID" with two digits, and "Name" fields. Leave the Active status as active.

- Click Save
Edit a Place of Service
- Click the "Edit" text at the end of the row you would like to edit.

- Only the "Name" and "Active" columns can be edited

- Click Save
Note: Places of Service cannot be deleted. They can only be inactivated or edited.
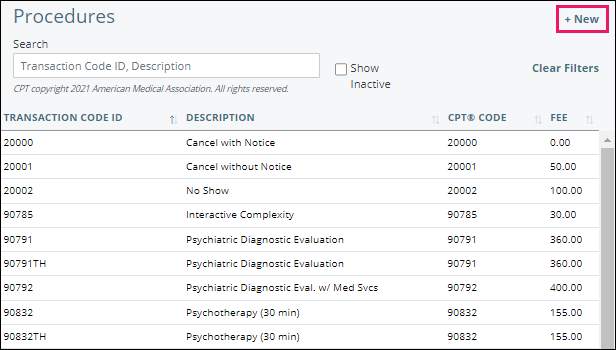
DeleteProcedures Setup
CPT/Transaction Codes are maintained by the practice, based on the services offered. This list comes pre-populated from Valant with commonly used mental health codes. Additional codes should be entered by a practice as needed. For instance, when a service is provided in more than one location (in office and/or telehealth at home), a separate procedure code is needed for each with the appropriate Place of Service designated. Another example would be setting up a procedure code for a Cancellation or No Show.
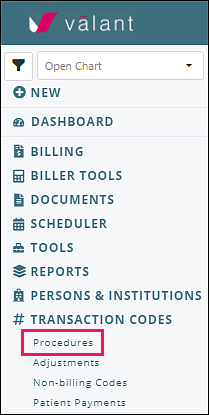
Click Transaction Codes | Procedures
Adding Transaction Codes
- Click + New
- Enter specific procedure information for the code. Transaction Code ID, Description, CPT Code, Service Units, Fee (needs a dollar format) and Places of Service are all required fields when adding a new code. The other fields are optional.
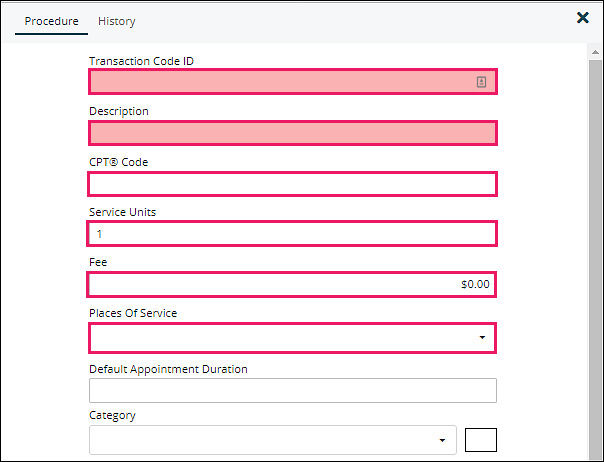
- Transaction Code: Cannot be modified once saved
- Description: Default descriptions are AMA behavioral health listings, can be modified
- CPT Code: Must contain a valid CPT code
- Service Units: Used for provider productivity based on time spent with patient (1 unit = 1 hour .5 units = 30 minutes) and shows on reports used for providers paid by the hour
- Fee: Practice fee for procedure
- Places of Service: Where the service occurred (Office, Telehealth, etc)
- Default Appointment Duration: Sets default length of appointment on scheduler
- Category: Applies a default color to appointments using the procedure code
Checkbox Options:
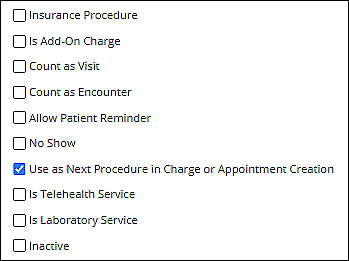
- Insurance Procedure: Indicates if a procedure code can be billed to insurance. (For example, cancellations can be billed to a patient but not an insurance company).
- Is Add-On Charge: Indicates whether or not a procedure is considered an Add-on Code.
- Count as Visit: Updates the "Last Visit" field in P&I | Patients | Demographics, and certain reports only show visits.
- Count as Encounter: Indicates whether or not this procedure counts for Meaningful Use. Is greyed out when Count as Visit is checked.
- Allow Patient Reminder: Indicates whether or not a Patient Communications | Appointment Reminder, if configured and activated, will go to the patient when they are scheduled for this procedure.
- No Show: Indicates that a procedure is being used as a No Show code. Based on this indicator, the Patient Communications | No Show Reminder, if activated, will send reminders to any patients who have the code updated for their appointment in a timely manner.
- Use as Next Procedure in Charge or Appointment Creation: Checked by default, indicates that this procedure will be automatically selected when the next appointment is created for the patient, when this is the last recorded appointment for that patient.
- Is Telehealth Service: Indicates that a procedure is being used as a Telehealth code. Based on this indicator, the Patient Communications | Telehealth Reminder, if activated, will send reminders to any patients who have the code in their appointment.
- Is Laboratory Service Checkbox: Indicates whether or not a procedure is a laboratory service.
- Inactive: Inactivates a procedure that is no longer being used. This hides it from the visible list.
Click Save when all desired options are selected.
Editing Transaction Codes
In order to edit an existing procedure code navigate to the list of codes and select an item from the list. This will allow all fields other than the Transaction Code ID to be edited. To save any changes to the code simply click Save.
DeleteBilling Types Setup
Billing type is a way to categorize the providers in a practice. This field is used in billing features such as Copay Schedule and Fee Schedule.
To setup Billing Types from the navigation menu click Reference Data | Billing Types.
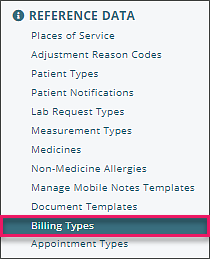
To add a new Billing Type, click the +New located in the upper right corner. Billing types require a name, but the description field is optional.
 Users can create as many billing types as needed. Billing Types that are no longer being used can be inactivated by selecting the "Inactive" checkbox and select Save. Billing Types can also be reactivated if they need to be used again by selecting the "Show inactive billing types" checkbox, select the inactive billing type, deselecting the "Inactive" checkbox and click Save.
Note: Inactivating a Billing Type does NOT automatically remove the associated Billing Type from the provider. This means that, if a patient is using a Copay Schedule for a specific Billing Type that has been inactivated, this Copay Schedule will still be used for any providers which still have the Billing Type. To avoid this, make sure to change the Billing Type associated with a provider under Persons and Institutions | Providers, after inactivating a Billing Type that is used by a provider.
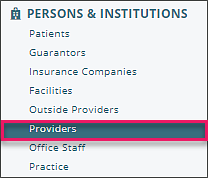
DeleteProviders Setup
Completing Provider information accurately is essential to the billing process. From the navigation menu select Persons & Institutions | Providers.
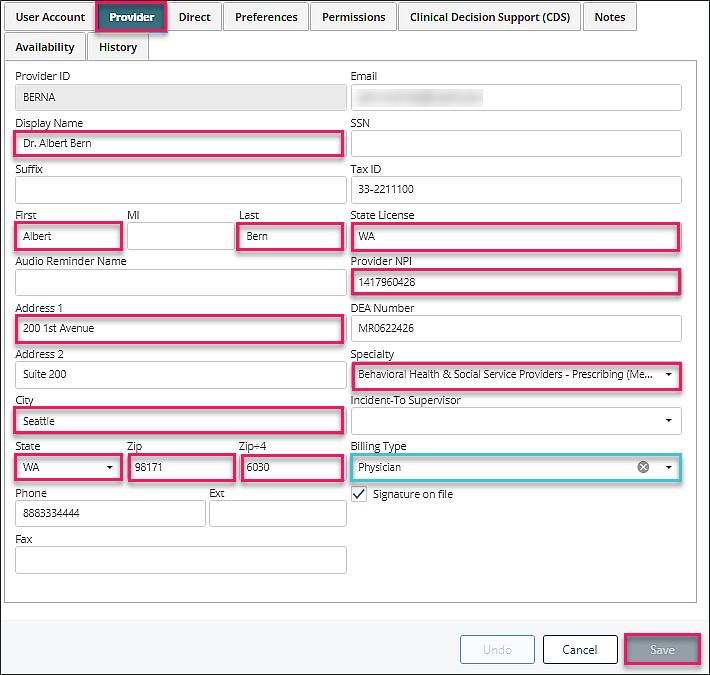
Select a provider to open up their details and numerous tabs that allow for configuration for the specific provider. Please note some tabs may not be available based on your practices configuration.
Provider Tab
The "Provider" tab contains the provider details and certain billing preferences for the provider. For the billing process, fields highlighted in pink are mandatory and Billing Type is optional depending on your need to bill providers at a different rate.
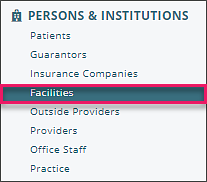
Facilities Setup
For users with the Admin Access permission the "Facilities" page allows users to edit facility details, availability, and history for facilities. To access this page , from the navigation menu select Persons & Institutions | Facilities.
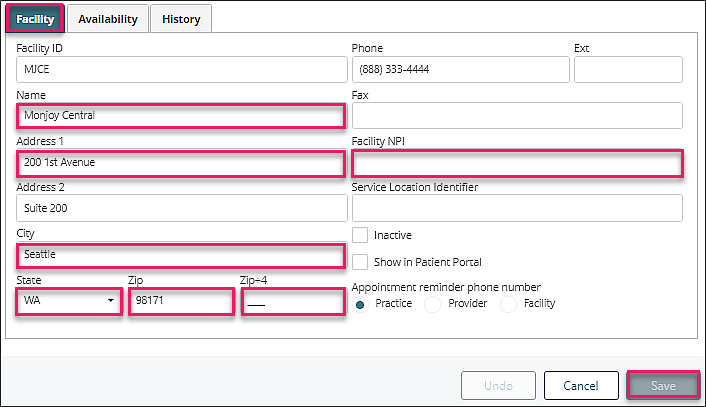
Facility Tab
Selecting a Facility from the list will open the "Facility" tab and show details for the facility like physical location, phone number, fax, facility NPI, and service location identifier. For the billing process, fields highlighted in pink are mandatory.
Insurance Setup
Insurance Companies may be automatically imported when you initially set up your account with Valant. For the billing process to be successful, you need to ensure there is complete information in the required insurance fields.
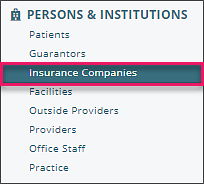
To access Insurance Companies, go to Persons & Institutions | Insurance Companies.
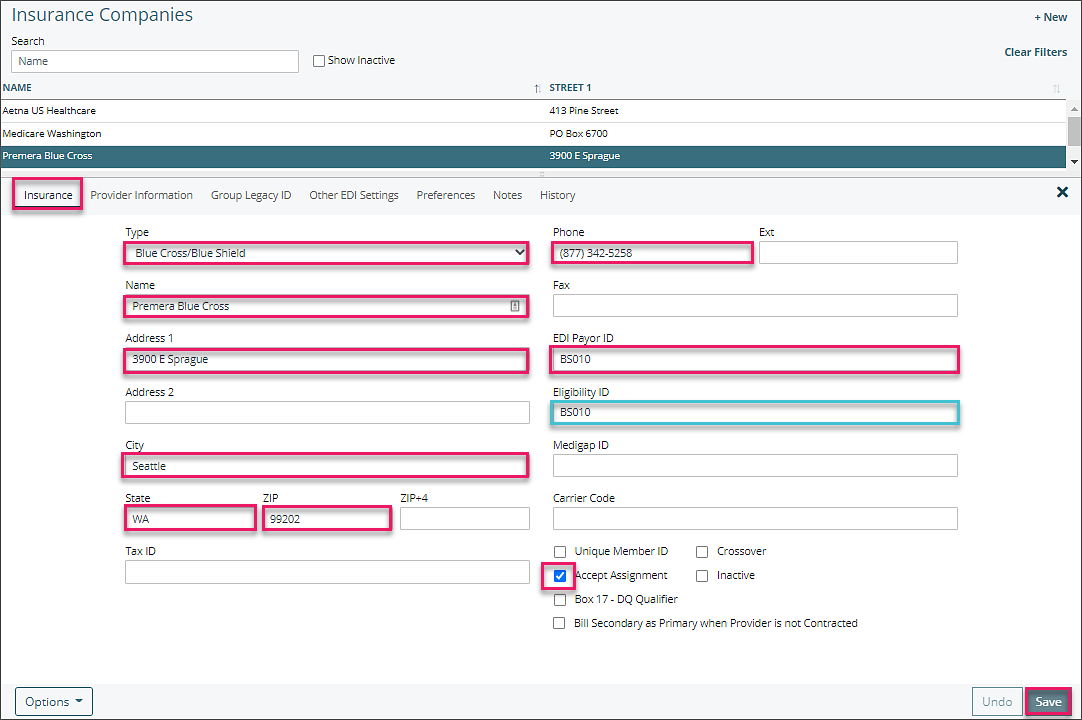
Insurance Tab
Select from the list of companies or click +New to add one not in the list. This will open the Insurance Tab. For the billing process, fields highlighted in pink are mandatory and Eligibility ID is needed if you are checking eligibility through your clearinghouse. The EDI Payor ID can be obtained from your clearinghouse.
Provider Information Tab
This tab allows you to determine which providers are contracted with an insurance company. Boxes in the CONTRACTED? column are checked by default.
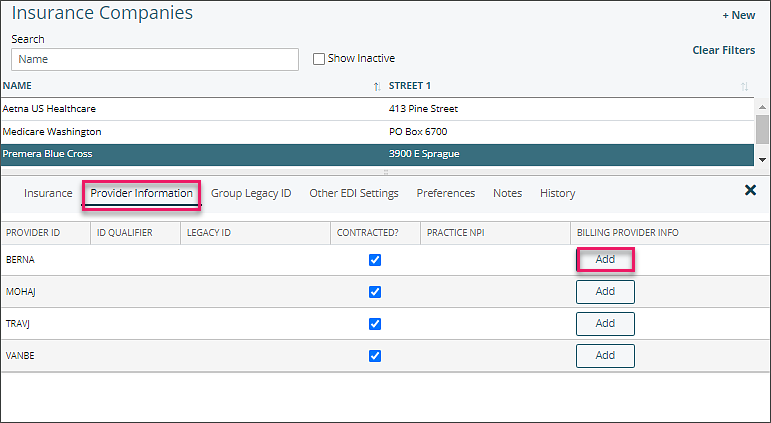
Clicking "Add" opens a Billing Provider Information window which populates box 33 on the CMS-1500 when you want a different pay-to-address to show rather than what is on your practice file.
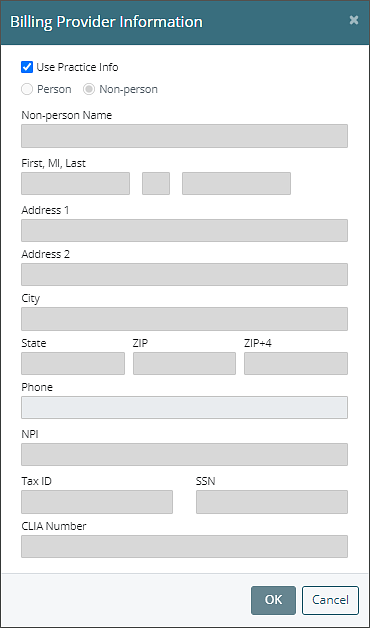
Note: Make sure you have the appropriate insurance company selected when updating or adding Billing Provider Information.
DeleteFee Schedules Setup
Summary
Fee Schedule is a way for practices to set up a variety of charges for the same CPT code across the list of providers, by insurance company, without having to create a new code for each provider. This is a way to bill a single CPT code with a variety of fees, based on the service provider and the insurance company. This means that a single transaction procedure code can be used for both the MD and Therapist.
Fee Schedule allows users to assign their Contractual Write-Off to all insurance billable CPT codes. These values will appear on the Apply Insurance Payment page, facilitating the manual entry of EOB (Explanation of Benefits) data which will aid in manual insurance payment entry as well as increase the accuracy of Estimated Productivity reports.
Fee Schedules also allows the CPT code to be assigned default modifiers so they automatically appear on appointments. This feature will not affect self-pay patients, or patients that do not have insurance coverage.
Note: Fee Schedule is a fairly complex addition to the system. Time should be taken to fully understand this feature as improper use can cause serious repercussions.
To access the Fee Schedule for a particular payer:
- Click on Persons & Institutions | Insurance Companies.
- Select a payer from the list.
- Open the Fee Schedule window by clicking on Options | Fee Schedule.
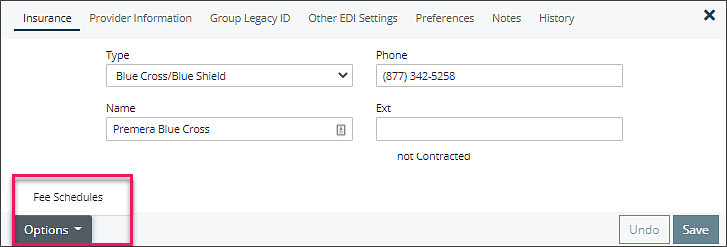
Note: Fee Schedule is specific to an individual insurance company. You will need to set up the schedule for each payer manually in order to make full use of the feature.
Creating a New Fee Schedule
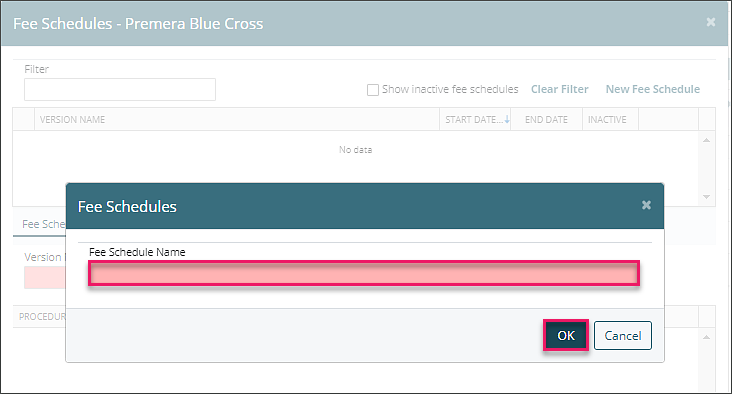
1. The first Fee Schedule created will be the default. Click the New Fee Schedule button located in the upper right corner of the window. 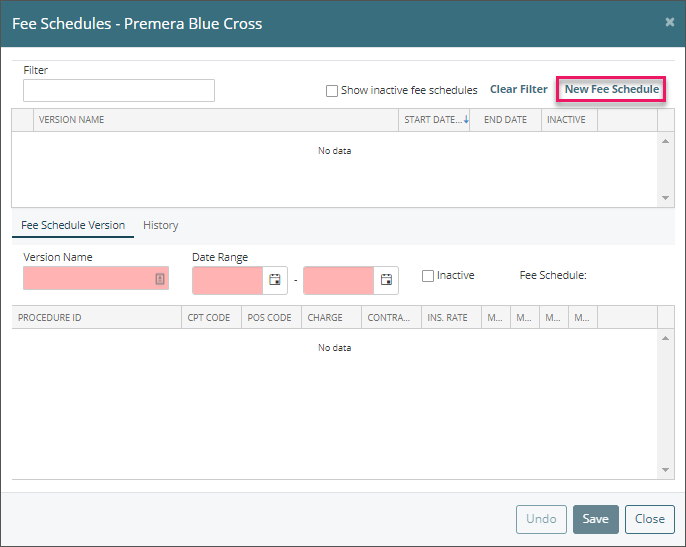
2. Enter a name for this (default) Fee Schedule type. This name is a category header for this Fee Schedule and subsequent versions. A best naming practice is to label your Fee Schedules with the current year and insurance company name. The name will be referenced on the Appointment window.
3. Enter the Version Name and Date Range. Best practice is to name the version for the current year/date range and create a new Fee Schedule Version annually or when an insurance company adjusts their rates. These dates are very important, as the system will only use a specific fee schedule if the service date of the charge falls within the range specified. If none of the Fee Schedules listed have an effective date that matches a particular charge, the system will use the default charge listed for the code under Transaction Codes | Procedures (no contract adjustment or modifier information will be applied).

The Fee Schedule window is split into two areas:
- The top portion lists all of the Fee Schedules which have been created for this payer.
- The lower half of the screen displays all of the details for the selected Fee Schedule.
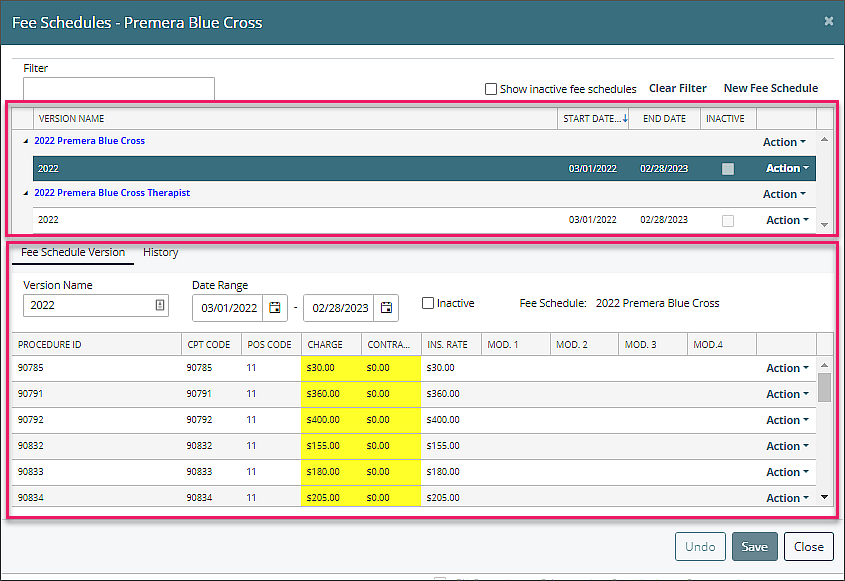
Fee Schedule – Upper Table
The upper portion of the window lists all the main types of Fee Schedules available, as well as alternate versions of each type. More than one type of Fee Schedule should be created when your practice is using Billing Types. Otherwise, only a single, default Fee Schedule is needed.
Each Fee Schedule type has an Action button located to the far right of the page. The options listed under the Action button vary depending whether the Fee Schedule type is the Default or not. The Action dropdown menu for the Default Fee Schedule is detailed below.
Note: You cannot assign a Billing Type to a Fee Schedule that is set as the Default. This is because the Default Fee Schedule applies to all providers, as it is used when no other Fee Schedules can be applied to a charge.
Action Button Options

- New Fee Schedule Version: This creates a new version of this Fee Schedule. It copies the details from the existing Fee Schedule as a starting point for the new version. This option allows you to set up future instances of a Fee Schedule, such as anticipating contractual changes over time.
- Change Fee Schedule Name: This renames the Fee Schedule.
- Show History: This displays the audit history of this Fee Schedule.
If the Fee Schedule is not the default, the options in the Action dropdown menu are slightly different. The two new items are detailed below.

- Set as Default: This sets the current Fee Schedule type as the Default. This means that this Fee Schedule will be used when none of the other listed Fee Schedules are valid for a given charge.
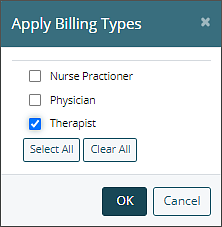
- Assign Billing Types: This option allows you to assign specific Billing Types to this Fee Schedule. The Billing Types must be assigned to providers under Persons and Institutions | Providers.
Fee Schedule – Lower Table
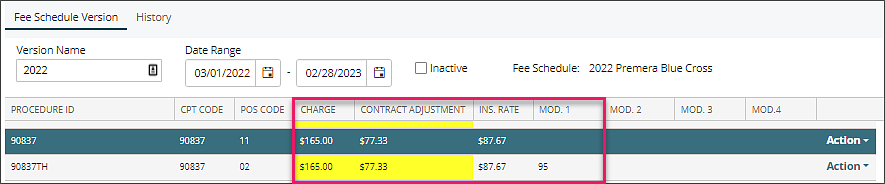
The lower portion of the Fee Schedule window displays the details of the Fee Schedule. Each row in the details is tied to a specific CPT code located in Transaction Codes | Procedures. Each CPT code has a POS (Place of Service) Code, Charge, Contract Adjustment, and up to four Modifier Codes that can be assigned.
Note: When a value is entered in the Contract Adjustment field, the Insurance Rate is calculated and adjusted appropriately. Do not enter the Insurance Rate in the Contract Adjustment field. See next image for example of Contract Adjustment, Insurance Rate calculation and Modifier use.
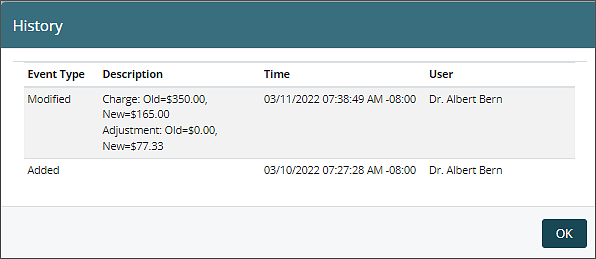
Each CPT code also has an Audit history. This is available in the Action dropdown menu to the right. The resulting Fee Schedule CPT Code History window will list the complete audit history of this particular CPT code for this Fee Schedule.
Fee Schedule on the Appointment Window
After a Fee Schedule has been created and in use, users will see a message on the appointment window showing which fee schedule is in use when scheduling or editing an appointment. This helps the user identify why a code might have a different charge amount than the default for the code. This message will also appear when the fee schedule pertains to the add-on code.
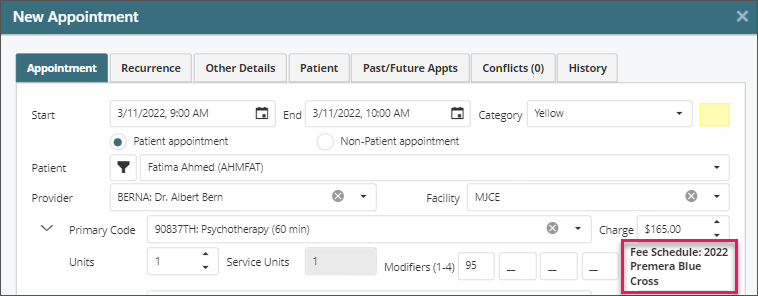
Note: This text showing Fee Schedule Name only appears when the assigned or Primary/Add-on Code is being added/Modified in the Edit Appointment Window. It will not appear when the appointment is reopened unless the provider or Code is changed, at which point it checks fee schedule again and displays the applied Fee Schedule Name.
Other Things to be aware of when using Fee Schedules
- Updating the Fee Schedule does not automatically update appointment already on the Schedule (both in terms of rates, and of modifiers).
- Updating the Fee Schedule does not automatically update already recorded charges Visible in Billing | View/Edit Charges.
In both of these cases, the change would need to be input manually, or you can have it pull fresh data by removing and re-adding the Primary and Add-on Codes from the appointment (or in recorded Charge via Billing | View/Edit Charges | View/Edit Detail).
Delete