
Documents that will be signed by patients must first be uploaded or created in Valant using the Document Type "Esignature Eligible". This will allow a practice to customize their own templates to be included in packets that will be sent to patients. Users who will creating templates must have the “Manage eSignature” permission.
Practices can upload their own documents into Valant for eSignature by:
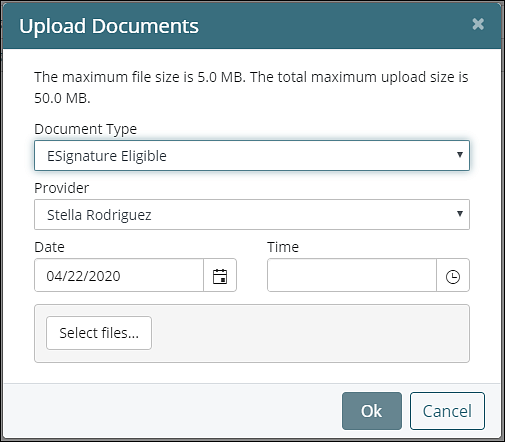
- Clicking Documents | Practice Documents | Upload Document
- Under "Document Type" select Esignature Eligible
- Select the specific file(s) to upload
- While pdf, docx, txt, and other file types are supported, due to spacing and formatting issues pdf files are recommended.
- Please note that the template name will be the same as the document name, so it is recommended to use unique names. If more than one template has the same name, then a number will be added to the end of the template name.
- Click OK
Uploading documents is the recommended way to create templates because of the preference for pdf file types. Practices can also create templates within Valant and prepare them for eSignature by:
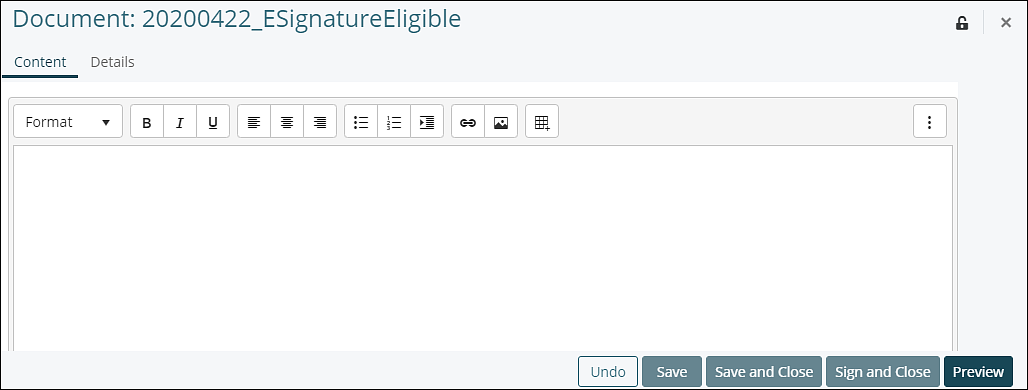
- Clicking New | New Practice Document, selecting Document Type "ESignature Eligible" and clicking Ok or by clicking Documents | Practice Documents | New Document, selecting Document type "ESignature Eligible" and clicking Ok
- Both paths take users to a text editor to configure docx that can be configured for eSignature
- Saving the document will put the document in Unsigned Documents. When the document is complete click Sign and Close
Documents that are Esignature Eligible can be inactivated or reactivated. This will have no effect on templates created from the document.
Configure for eSignature
After being uploaded or created in Valant users will need to "Configure for eSignature" from the "Practice Documents" page. To configure a document for eSignature:
- Click Action | Configure for eSignature
- This will open a page to configure the document into a template. This includes options to include fields for signature, initials, date signed, textbox, or checkbox. All fields are drag and drop that can be dragged directly onto templates and resized
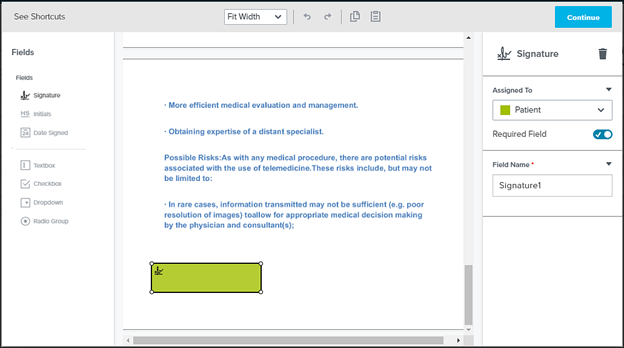
- Click Continue when finished
- Documents configured into eSignature templates can be edited by clicking Action | Edit eSignature Template
- Note: When you edit an eSignature Template, any eSignature requests containing that template that are in “unsigned” status will use the NEW version of the template; if they are in “initiated” status they will use the OLD version of the template. If you don’t want the unsigned eSignature requests to use the new version, then instead of editing the template you should upload a new document and create a new template
- Templates can only be signed by the patient
- Adding hyperlinks to eSignature documents is not currently available
- Note: Credit card information should not be collected through eSignature Requests
Once one or more documents have been prepared for eSignature they must be organized into packets. Learn more about eSignature packets here. After a template has been created users will have the option to select "Inactivate eSignature Template" from the "Action" dropdown. If users inactivate a template, they will receive a pop-up warning about the inability to include the templates in packets, or it being removed from existing packets. Inactivating a template will remove it from packets. It will not affect eSignature Requests already sent to patients. Templates can be reactivated to be included in eSignature Packets.