
Update April 10, 2024:
- More detailed information was added to the Upload Claim to IEDI section below.
- In that section, the Practice's OPTUM ID is needed for uploading claims. This unique ID will come in an email from Valant to the practice's EDI billing contact. If it is not received, contact Valant Support.
Change Healthcare temporary workaround is available: Optum is now offering an alternative claim submission solution - called Optum Intelligent EDI (IEDI) - to Valant customers until Change Healthcare Revenue Performance Advisor has been restored. This option is available without a contract, at no cost, and will allow export of EDI files from Valant to upload directly into IEDI. There will be no integration with Valant and IEDI.
Designated EDI billing contacts are pre-enrolled in this program to ensure this option is available, should you choose to use it. This contact will receive an invitation from Optum via email to complete the account setup process.
IEDI Log In
You may access the Optum Intelligent EDI Portal using the One Healthcare ID link provided via email. The email instructs you to create your One Healthcare ID profile account.
If you were already logging in to Change Healthcare (RPA) using a One Healthcare ID (OHID), you will use your existing user name and password.
Currently, your One Healthcare ID can be set up with or without the use of an authenticator, however the use of an authenticator may soon be required.
When you have completed the steps to set up your One Healthcare ID account your username and applicable roles will be activated, and the URL for the Optum Intelligent EDI is https://optumprovider.optum.com/iedi-portal/
Going forward you have the ability to manage your One Healthcare ID Profile, including resetting your own password.
Set up One Healthcare ID Account
Setting up your One Healthcare ID Profile account includes the following steps.
- Create your One Healthcare ID – store personal information necessary for account recovery, store email address, Username, and Password where required
- Verify Email Address – validate your email address (certain users must verify phone number)
- Sign In – respond to any questions for security and device recognition
- Setup Authenticator – this option selection may be offered after logging in
Create One Healthcare ID
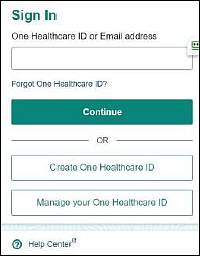
Begin by using the One Healthcare ID link to open the Sign In form and select the Create One Healthcare ID button, or by using the link in your initial email message to directly access the Create One Healthcare ID form.
You must complete the required portions of the Create One Healthcare ID form, which includes personal information and may require a Password. A particular form is provided based on your application configuration, such as the sample image shown below.
It is important to note that clicking the Continue button indicates your acceptance of One Healthcare ID service Terms of Use and Website Privacy Policy.
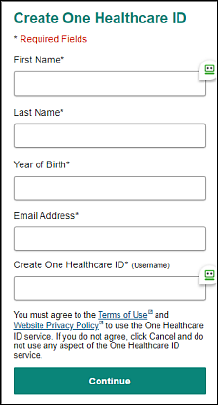
You are prompted as needed for current constraints related to One Healthcare ID (aka username) and password selection, if necessary, and any missing elements. A password must satisfy current security standards, and it is case-sensitive.
Follow the prompts to complete the form, which generates an automated email response.
Verify Email Address
Upon successful completion of the Create One Healthcare ID form you must check your email for the automated email response in order to verify your email address and activate your One Healthcare ID.

Select the Activate my One Healthcare ID button, or copy and paste the activation code onto the form displayed to verify your email address.
A success message displays when your email address is verified. You may need to select Continue to complete the action.
If you are using a shared email you may be instructed to provide additional information to secure access, such as a phone number or security questions and answers that you have selected. This information can be later used if you are prompted to verify your identity.
Sign In
Use the One Healthcare ID link to access your applicable Sign In form. A particular Sign In form displays based on your application configuration, and may or may not require you to enter a Password.

Setup Authenticator
After logging in you may be offered the option to set up an authenticator by completing the current steps, such as described in the Setup an Authenticator to Keep Your Account Secure form as shown below.
Using an authenticator eliminates the need to maintain a password, and is more secure.
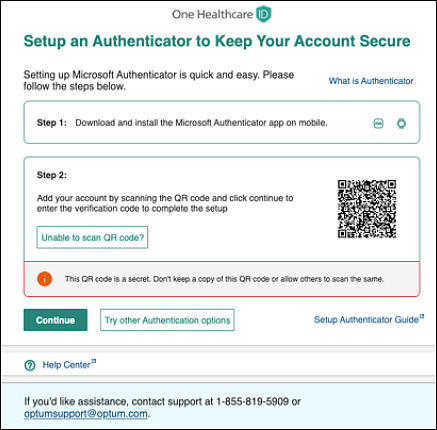
Note that you can select the Try other Authentication options button, if you wish to set a password. Complete the applicable form displayed and submit. A success message displays when your Password is set up.
Authenticator provides various avenues when you are prompted to verify your identify, such as via text message, email, a call, or via Authenticator.
Manage One Healthcare ID Profile
You can access and manage your One Healthcare ID Profile using the Profile option in the page banner (in the drop down by your name) and selecting the One Healthcare ID Profile link.
Manage the following from your One Healthcare ID Profile:
- Manage My One Healthcare ID – Change One Healthcare ID
- Profile Information – update your personal information
- Contact Information – you must ensure that your current email address and phone number is stored in your One Healthcare ID Profile to receive alerts from the Portal, and to facilitate self-service recovery of your account
- Account Settings – Change Password (note that you are required to change your password every 90 days); Change Notification Preferences for alerts (email or text message); Add or Update Security Questions to support notifications and self-service recovery; Set up Authenticator; and select Communication Language
You may edit your One Healthcare ID Profile as needed via the One Healthcare ID Profile link. Select Save when your updates are complete, and use the Return to Application link or simply return to the Home page.
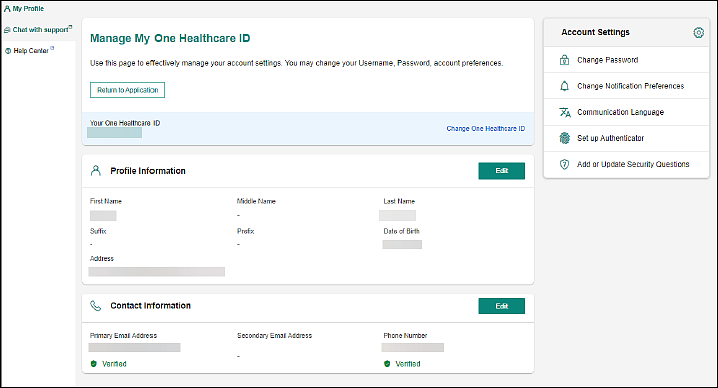
If you need guidance you can select the Help Center option, or Chat with support. If you need further assistance, contact support at 1-855-819-5909 or optumsupport@optum.com.
Self-Service Recovery
You must ensure that your current email address or phone information is stored in your One Healthcare ID Profile to receive alerts, and to facilitate self-service recovery of your account.
The Notification Preferences provided on the Manage Your One Healthcare ID page enable you to request an alert for the events you designate via email or text message.
You have recovery links provided at Sign In if you forgot your One Healthcare ID, Username or Password.
To verify your identify and ensure account security you may be challenged to answer your selected Security questions, to receive and enter verification code, such as via email, text, or phone call.
Note that any requested email notifications are sent to your primary address stored in your One Healthcare ID Profile. You may edit your One Healthcare ID Profile as needed.
Forgot One Healthcare ID
Use the Forgot One Healthcare ID link at login, and follow the applicable prompts, such as entering your email address, to receive your One Healthcare ID.
Forgot Password
Use the Forgot Password link at login to initiate a reset of your password, and follow the applicable prompts, such as entering your email address. You may be required to confirm your identity. Reset your password when prompted.
Account Recovery Attempt
If you lose access to your email address you can use the Forgot One Healthcare ID link at login, which provides self-service recovery using your email address.
Unlock Your Account
A Password locked form displays if your account becomes locked. Follow the applicable prompts to confirm your identity. You may be required to contact Support in order to have your account unlocked.
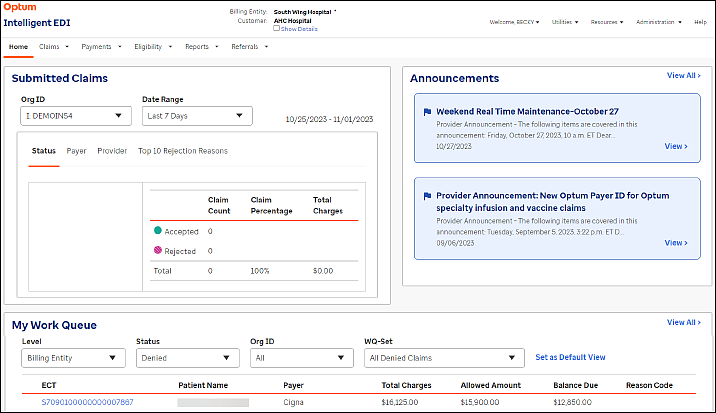
DeleteIEDI Home Screen
The Optum Intelligent EDI Home page provides an interactive dashboard containing elements such as the following:
- Submitted Claims – reports by Status, Payer, Provider, Date, and Top 10 Rejection Reasons
- My Work Queue -- your personal Work Queue
- Announcements -- pertinent only to Intelligent EDI
Upload Claim to IEDI
Navigate to Persons & Institutions | Practice | EDI Configuration tab.
For IEDI Submission, the following MUST be entered:
In the below list, the Practice's OPTUM ID will come in an email from Valant to the practice's EDI billing contact. If it is not received, contact Valant Support.
- EDI Submitter ID: Practice's OPTUM ID
- EDI Sender ID Qualifier (ISA05): Select "Mutually Defined" from drop-down options
- EDI Sender ID (ISA06): Practice's OPTUM ID
- EDI Receiver ID Qualifier (ISA07): Select "Mutually Defined" from drop-down options
- EDI Receiver ID (ISA08): OPTUM
- EDI Application Sender’s Code (GS02): Practice's OPTUM ID
- EDI Application Receiver’s Code (GS03): OPTUM
- EDI Receiver Name (1000B-NM103): OPTUM
- EDI Receiver Primary Identifier (1000B-NM109): 454683454
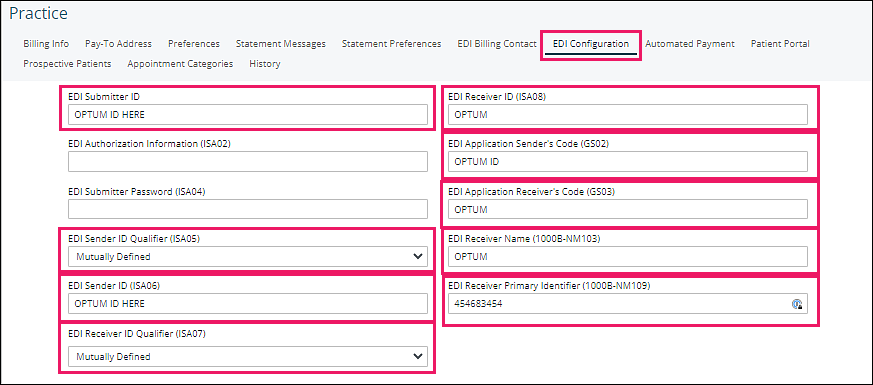
Note: If the practice bills through a different clearinghouse, the information in the above fields should be deleted.
Navigate to Billing | Create Insurance Claims
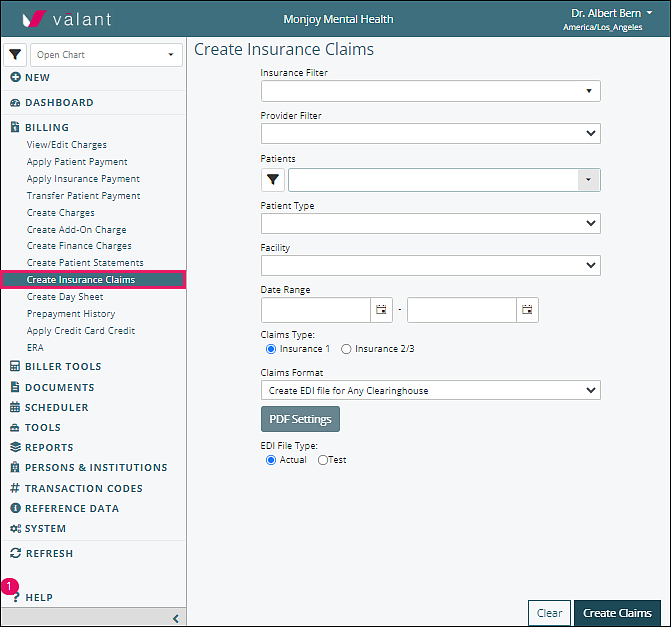
Select payer from “Insurance Filter” drop-down options
Select “Create EDI file for Any Clearinghouse” from “Claims Format” drop-down options
Click Create Claims which creates and downloads a text file for payer submission in the browser download folder
Click Mark Claims as Printed and Save Claims from Create Insurance Claims window which saves the claim in View/Edit Charges
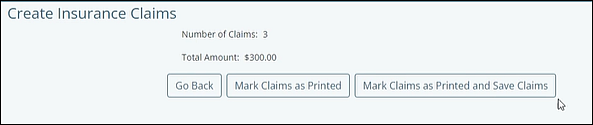
Log in to Intelligent EDI, click the Claims tab. From Claim Files click + Upload Claim File to open and complete that form.

Click Select Files and select the text file from the Downloads folder, then click Upload
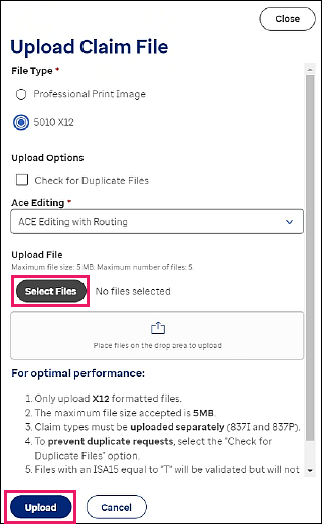
If the upload is unsuccessful any error messages are displayed.
If a claim file does not contain the correct values it will not be validated during file upload, and an error message will be displayed.
DeleteSearching Claims in IEDI
Claim Search
The Intelligent EDI Claim Search function provides filtered searching that enables you to effectively perform activities related to the following:
- Correct and Resubmit – edit rejected, denied or accepted claims to correct and resubmit
- Generate Volume Reports
- Generate Claim Reports
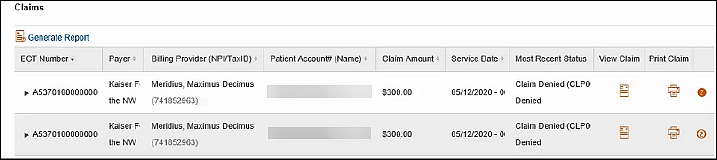
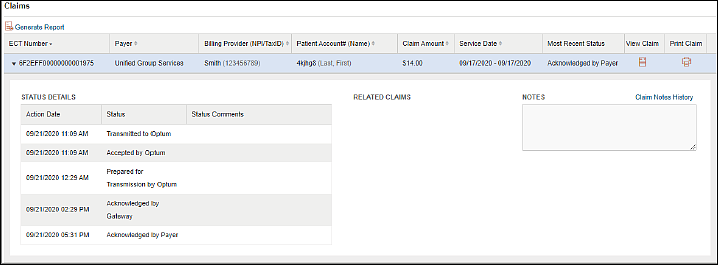
Claim Search – Results
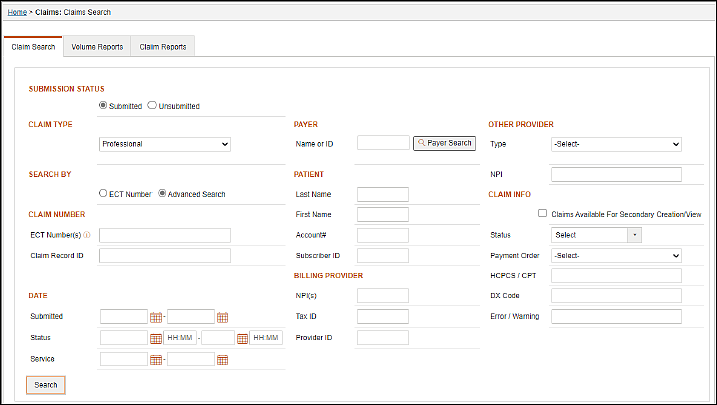
Task: Search submitted/unsubmitted claims in order to finalize, view status details, view related claims and history, create claim status response, print claims, correct and resubmit claims, manage secondary claims and generate a report of search results.
Navigation: Claims/Claim Search/Claim Search
Select Claims/Claim Search to open the Claim Search form, as shown below.
Begin by selecting a Submission Status, and Claim Type — Professional, Institutional, or Dental — and then you can search for claims using one of these three methods:
- Search By ECT Number – enter the Electronic Claims Tracking Number (the clearinghouse claim identifier)
- Search by Claim Record ID – enter the unique identifier generated by the Portal when the claim was created
- Search By Advanced Search – enter any known information into the Claim Search form. Search results correspond to the amount of information you enter on the form. You can narrow your search by entering more information in the form.
- Search without entering any information – results will reflect all claims submitted for the selected Billing Entity for the previous 7 days, which may result in an extended search time.
The search results is limited to a display of 500 records. You may adjust your search criteria to return fewer results.
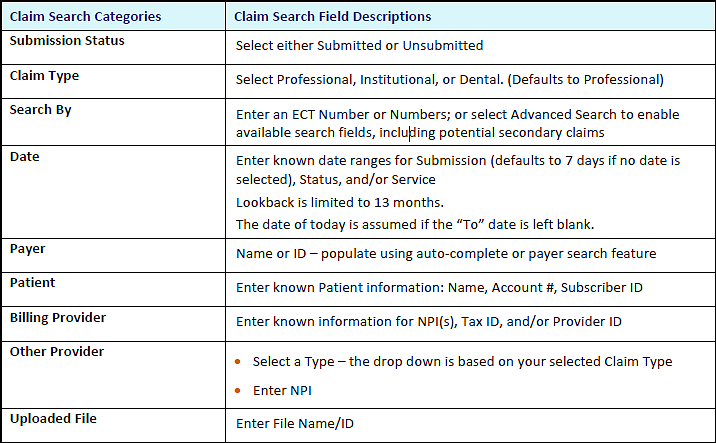
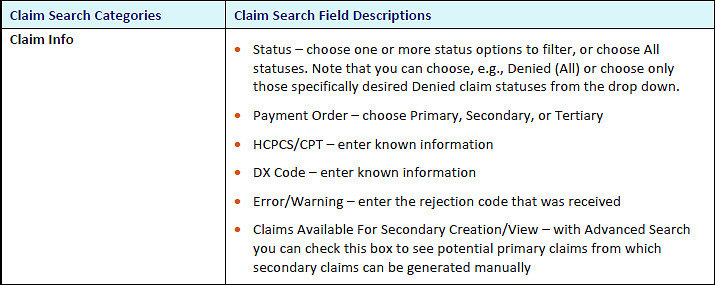
Claim Search form categories and fields are described in the table below.
Select the Search button to obtain results, which is limited to a display of 500 records.
DeleteCorrecting Claims in IEDI
Task: Edit rejected, denied or accepted claims and resubmit.
Navigation: Claims/Claim Search/Claim Search
Select Claims/Claim Search to initiate a search as described in Claim Search - Results to obtain search results displayed in the Claims grid. Use the View Claim icon in the Claims grid to open the desired claim form.
From the claim form you can select the links available in the ribbon to perform desired actions.
- View Claim History, which also includes resubmissions history. The cascading Claim History provides a view of the tracking log for each previous parent or child claim, and provides a link to view each previous parent or child claim as saved at that time.
- Use the Correct and Resubmit link (lower right) to initiate an adjusted claim. If a corrected claim has already been created you have the option to use the View Corrected claim link.
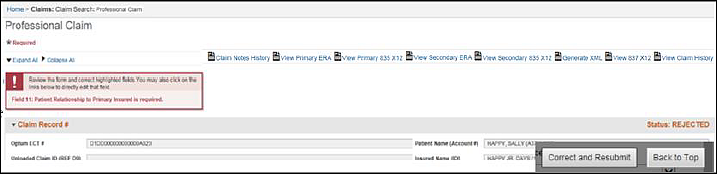
Using the Correct and Resubmit button creates a copy (child) of the rejected, denied or accepted claim with a new Claim Record ID, and places this child claim in a Saved status. You may select the row of any parent or child claim to open the details pane and view Related Claims information.
For a rejected or denied claim this new child claim reflects all of the errors from the parent claim so you can work through the corrections. This Claim Rejections information is displayed in red.
For an accepted claim you must determine any adjustments appropriate for resubmission.
You have the ability to initiate a corrected claim and use the Save Progress option to keep your edits as a partially completed corrected claim. When you resume work you can search for Unsubmitted claims in a Saved status (rather than a rejected, denied or accepted status) to finalize this claim for resubmission.
Make the necessary corrections, enter any notes (optional), and select Submit to resubmit the adjusted claim.
DeleteCustomer Support
If you have any questions, issues, or concerns you may call 1.866.678.8646.
The following information may be helpful:
- Recommended browser is currently Microsoft Edge.
- It is suggested you open a new browser session each time you log in.
- If you do not have your cursor in a field and you use the Backspace key the response is that of the browser Back button, i.e., you will be navigated to the previous page.
- Your session times out after 15 minutes of inactivity.