
Prerequisites to access the Prospective Patients page:
Practice must have the “Prospect” module enabled
- Automatically enabled if a Power customer
- If interested in accessing the Prospective Patient Management functions, and not a Power customer, reach out to the team to upgrade to the Power subscription plan
User must have the “Persons & Institutions” permission
Purpose
The Prospective Patients page is a queue of prospective patients who have filled out the online inquiry forms OR have been manually added by a Valant IO user
Prospective Patients are managed from this page until they are either:
- Converted to a patient, OR
- Inactivated (e.g., because they are no longer interested in becoming a patient or were referred to an outside provider)
Prospective Patients Table Overview
Navigate to Persons & Institutions | Prospective Patients
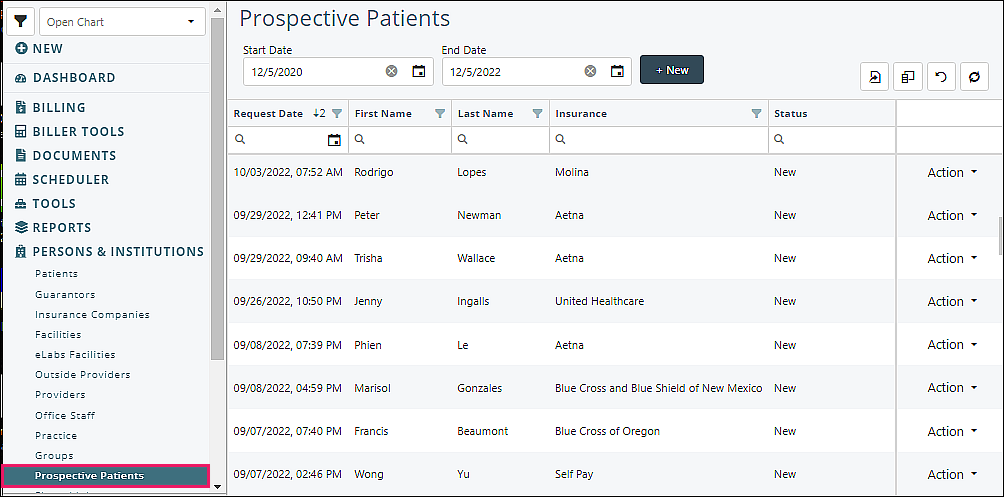
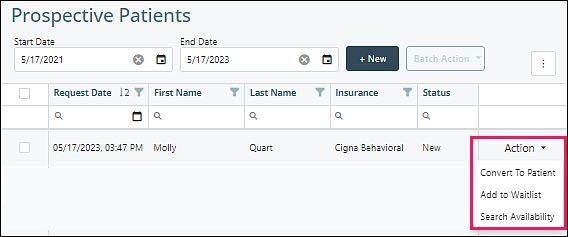
The opening screen contains a table of all prospective patients that have been entered via the online inquiry forms or from the “+New” button
Column Navigation
- Clicking on the filter icon to the right of the header for any column opens a type-in search field and clickable list of the column contents
- The arrow to the left of the "Request Date" filter can be clicked to toggle between dates in order of most recent date at top or oldest date at top of the column
- The calendar option in the "Request Date" column allows selecting a date from a calendar option
- Clicking in the search field below the column header allows for type-in search ability to narrow down contents
- To re-order the columns, click and drag a column header to the desired location
Top Right Icon Buttons
 |
Export All Data: exports the current columns and contents of the table into a .csv file |
 |
Select Columns: allows adding or removing columns from the table using a list with checkboxes |
| Clear Filters and Search: removes all filters and search parameters, showing the full contents of the table | |
 |
Refresh Data: refreshes the table to show the most up to date data, including any changes made by other IO users or new entries from the online prospective patient forms |
Other Opening Screen Navigation Tips
To manually add a new prospective patient, click +New
To view or edit an existing prospective patient record, click on the row in the table
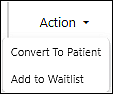
Using the “Action” drop-down list options to the right of each entry with a "New", "Active", or "Waitlist" status, you can convert the prospect into a patient or add them to the waitlist
Viewing/Editing a Prospective Patient Record
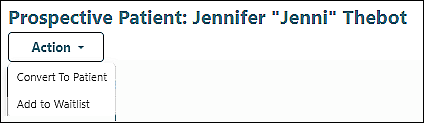
Clicking a row in the main prospective patient table will open a record for that row with several tabs to navigate.
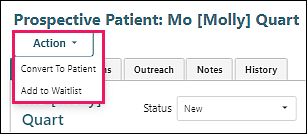
The top view includes the Action drop down options to "Convert To Patient" or "Add to Waitlist"
Overview Tab
Includes a summary of the prospective patient forms and tools for matching the prospective patient to a provider.
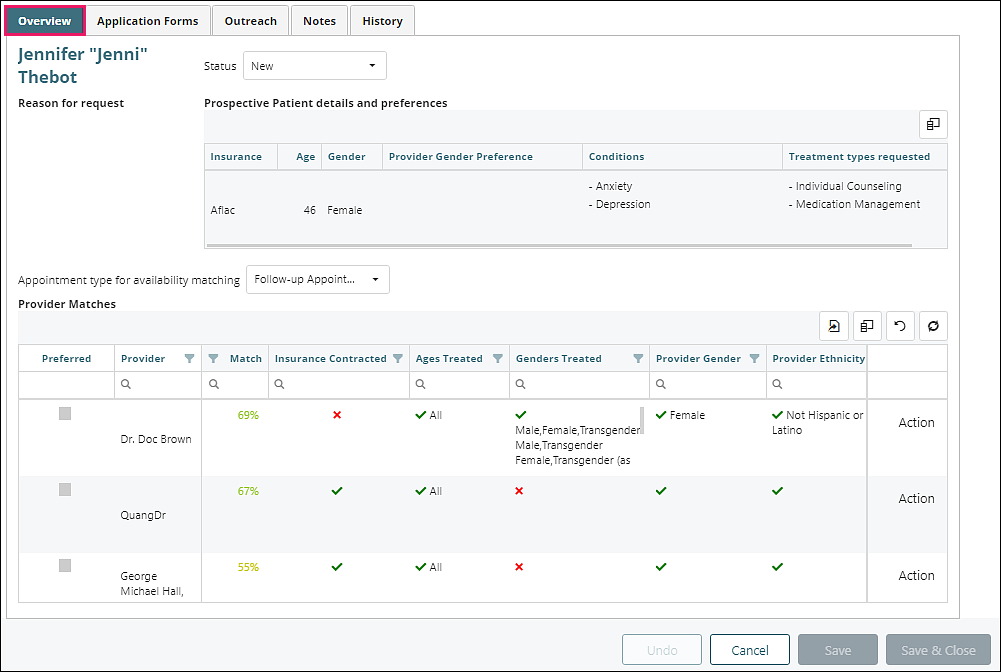
The prospective patient’s name and reason for requesting services are displayed in the top left
The “Status” field indicates the current status of this record
- New prospective patients will be in the “New” status by default
- Upon reviewing the record, users can change the status to “Active” in order to distinguish from unreviewed new entries
- The “Inactive” status can be used for individuals who are no longer considered active prospective patients (e.g., because they were referred to another practice, did not respond to outreach attempts, or expressed that they are no longer interested in services). NOTE: a recommended “best practice” is to add details to the “Notes” column regarding the reason for marking a record “Inactive”
- Once a prospect is converted to a patient, their status will automatically switch to “Converted to Patient”
- If a prospect is added to the waitlist, their status will automatically switch to “Waitlist”
The “Prospective Patient details and preferences” table shows a summary of the details entered into the prospective patient application forms
- The purpose of this table is to summarize important details that help match the prospect to a provider who will best meet their needs
- The columns included in this table can be customized via the “Select Columns” icon above the right side of the table
The “Appointment type for availability matching” field is used to inform the appointment columns in the Provider Matches table. It informs the system what duration of appointment to search for when determining the next available appointment based on each provider’s availability and the availability of the prospective patient.
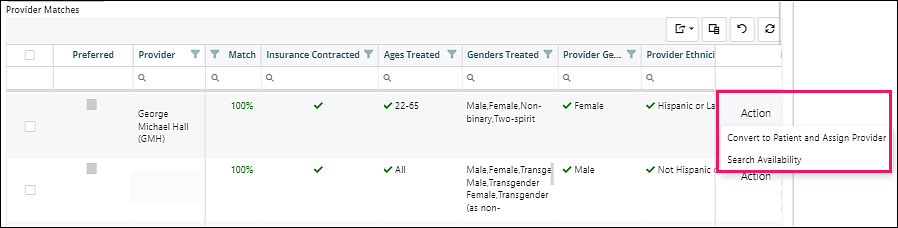
The “Provider Matches” table lists each provider and shows details to inform whether the provider meets the prospective patient’s treatment needs and preferences
- Most of the details in this table are informed by the “Treatment Profile” tab in Persons & Institutions | Providers
- By default, the table is filtered to only include providers with the “Accepting New Patients” field marked “True”
- This filter can be removed via the dropdown under the “Accepting New Patients” column or by clicking the “Clear Filters and Search” button above the table
- Visual cues in each column indicate whether the provider matches the patient’s requirements or preferences in that category
- A green checkmark indicates a match (for example, a green checkmark in the “Insurance Contracted” column means that the provider is contracted with the prospective patient’s insurance company)
- A red X icon indicates the provider does not meet the requirement in that column (for example, a red x in the “Ages Treated” column means that the age range treated by that provider excludes the age of the prospective patient)
- The “Match” column gives an overall weighted match score based on the factors in the other columns
- By default, the table is sorted to show the highest match scores at the top
- The “Action” button to the right of each row can be used to assign that provider and convert the prospective patient into a patient
- The 4 button icons above the right side of the table can be used for the following actions:
 |
Export All Data: exports the current columns and contents of the table into a .csv file |
 |
Select Columns: allows adding or removing columns from the table using a list with checkboxes |
| Clear Filters and Search: removes all filters and search parameters, showing the full contents of the table | |
 |
Refresh Data: refreshes the table to show the most up to date data, including any changes made by other IO users |
Application Forms Tab
Includes sub-tabs for each section of the prospective patient application that is filled out via the online forms.
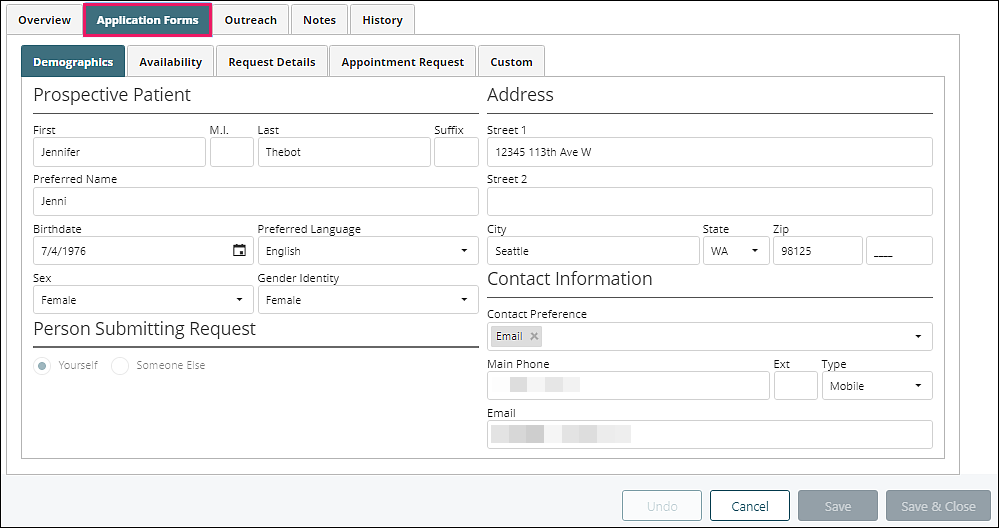
All details in each tab can be edited from here
If any required fields are missing a valid response, the field will be highlighted with a red border. The tab(s) containing the missing field(s) will be marked with a warning icon
The sub-tabs included under the “Application Forms” tab are based on the same settings that determine which sections are included in the online forms. These settings are configured in Persons & Institutions | Practice | Prospective Patients
Outreach Tab
This tab is for tracking attempts to contact the prospective patient. Tracking each outreach attempt in its own record makes it easy to see how many attempts have been made and when the most recent outreach took place. When viewing the main table of all prospective patients, those factors can be used to help prioritize the queue for follow-up.
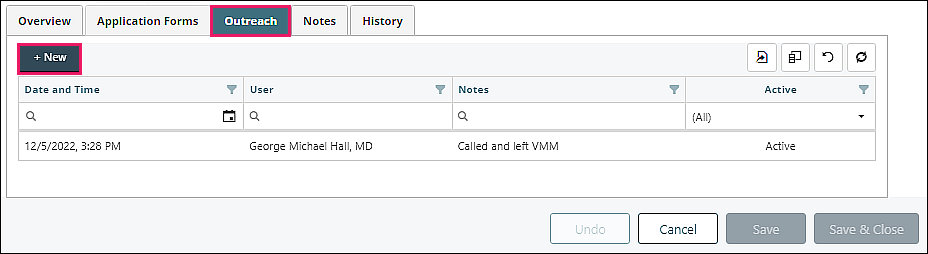
Click +New to add a new outreach record
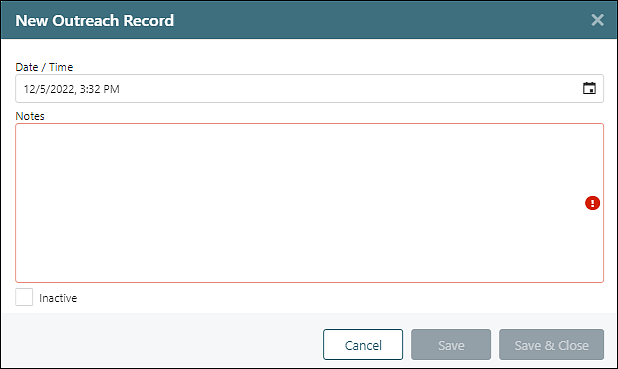
- The date and time of the outreach will default to the current time, but can be manually edited
- The “Notes” column can be used to add details about the outreach attempt (for example, the method and result of the outreach attempt)
- The “Inactive” checkbox can be used to inactivate an outreach record
Click any row in the table to edit the outreach record
Notes Tab
This tab provides a free text field for entering any details about the prospective patient that are not covered in another tab.
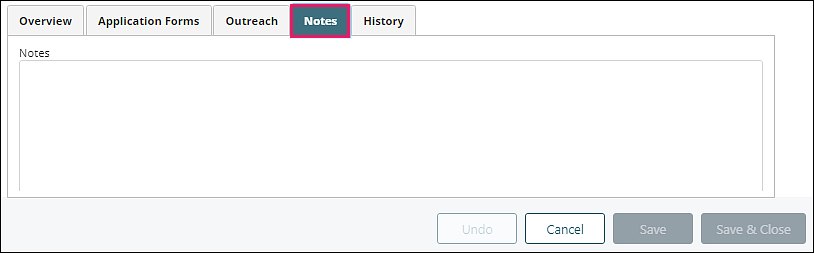
- If the prospect is converted to a patient, the contents of the “Notes” tab will populate the “Notes and Image” tab of the patient record
- When changing a prospect’s status to “Inactive,” it is a recommended best practice to use the “Notes” tab for documenting the reason for inactivation for future reference
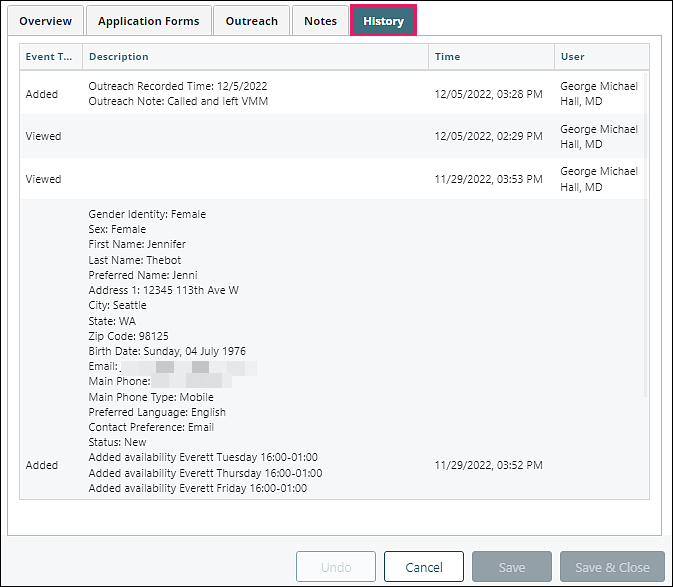
History Tab
Audit of all changes made to the prospective patient record, including what changes were made, when, and by whom.
Converting a Prospective Patient to a Patient
When a Prospective Patient is converted to a Patient, their demographic and insurance information will carry forward into their new patient record in Persons & Institutions | Patients without the need for manual re-entry. A PDF document will also be automatically added to the new Patient Chart that contains the contents of their Prospective Patient forms.
The Prospective Patient record will continue to exist in Persons & Institutions | Prospective Patients for reference. It will have a status of “Converted to Patient,” and Valant IO users responsible for managing the Persons & Institutions | Prospective Patients queue will typically want to filter out this status and the “Inactive” status in order to focus on new and active prospective patients.
The different ways for converting a Prospective Patient into a Patient are listed below.
Availability Search
For practices that aren’t using the “Appointment Request” step in the Prospective Patient forms, the most efficient workflow for converting a Prospective Patient into a patient and scheduling their first appointment is through the Availability Search in the Overview tab.
- Navigate to Persons & Institutions | Prospective Patients | select from the list.
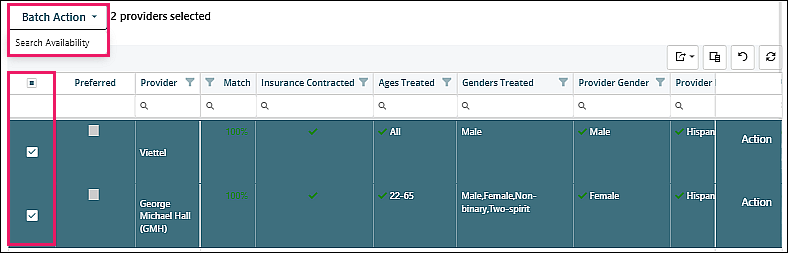
- In the Provider Matches table, use the left column checkboxes to select one or more providers to include in the availability search.
- In the “Batch Action” dropdown menu, click Search Availability.
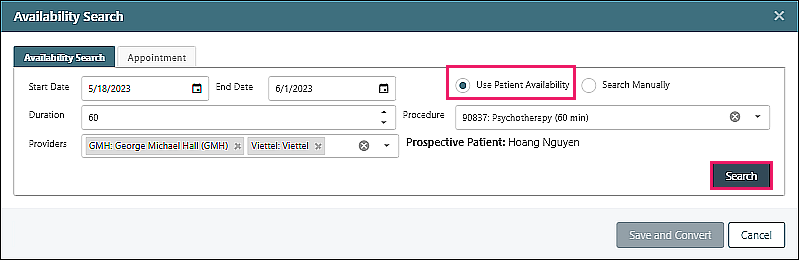
The Availability Search window will open.
- Set the Start Date and End Date to search within that range.
- Toggle the “Use Patient Availability” option to search using the availability entered in the prospective patient forms, OR select “Search Manually” to manually enter days, times, and facilities to search. Both views are depicted below.
"Use Patient Availability" option selected:
"Search Manually" option selected:
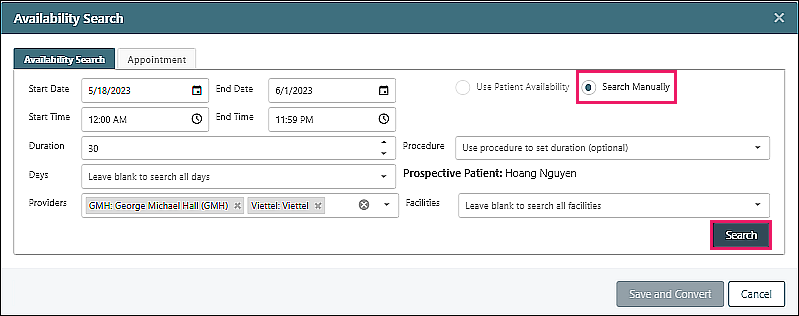
- Enter the duration and (optionally) procedure code for the appointment.
- The Providers field will be populated from the selections in the matching table and can also be manually updated here using the drop-down options.
- Click Search to see a list of appointment slots that are available for both the provider and prospective patient.
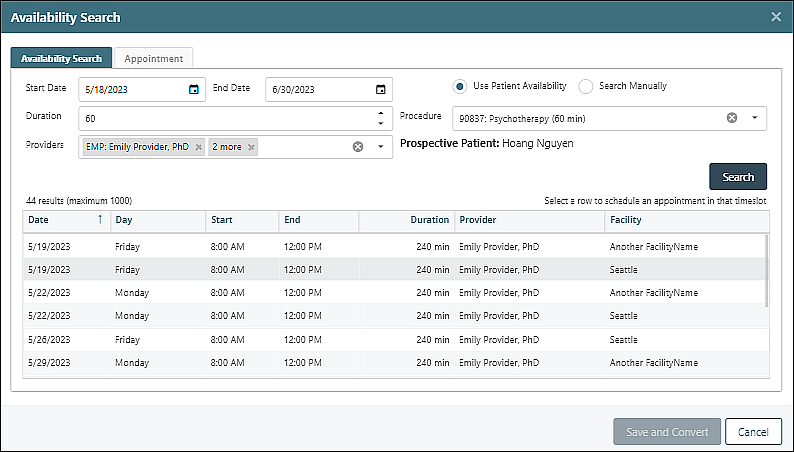
- Select an appointment slot to review (and update, if needed) the appointment details.
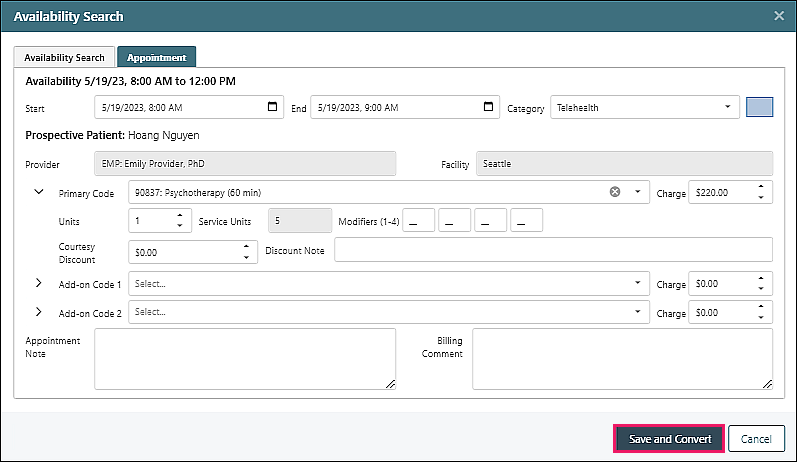
- Click Save and Convert which automatically creates the patient record, assigns the selected provider, and schedules the appointment. Green banners will briefly appear at the top of the window to indicate the patient was saved and the appointment was created.
If partial insurance information was entered, you will be prompted to enter any missing details.
Convert to Patient and Assign Provider
This option is recommended when the provider that will be assigned has been identified through the Provider Matches table, but the Availability Search is not needed (e.g., because an appointment was already requested via the forms, or because an appointment will not be scheduled until after the patient completes portal onboarding, etc.).
- In right column of the Provider Matches table, click Action | Convert to Patient and Assign Provider.
- Review the patient demographics and click Next to proceed to create the patient record.
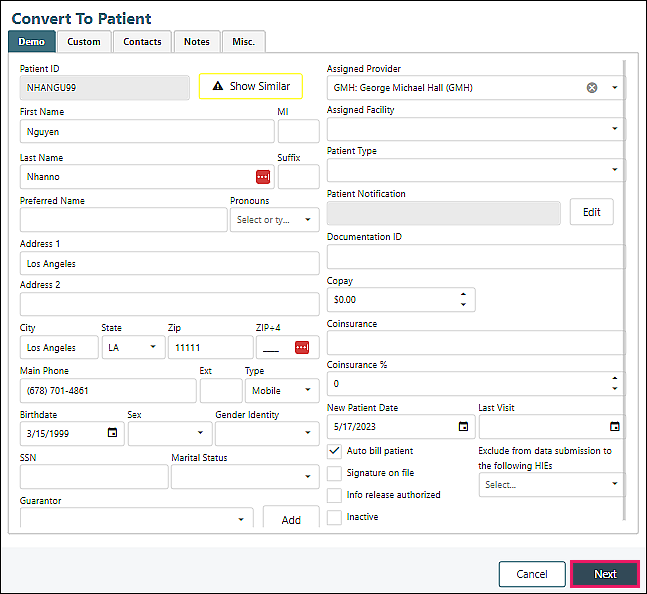
If partial insurance information was entered, you will be prompted to enter any missing details.
Convert to Patient
This option is similar to the "Convert to Patient and Assign Provider" option except that that the assigned provider will not be automatically selected (unless the user taking the action is a provider, in which case they will be selected by default).
- From the Action dropdown menu click Convert to Patient.
At the top of the selected Prospective Patient record view:
In the right column of the main Prospective Patient table view:
- Review the patient demographics and click Next to proceed to create the patient record.
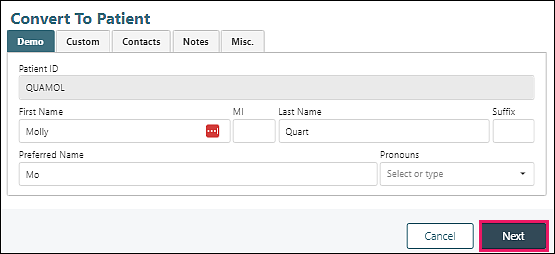
If partial insurance information was entered, you will be prompted to enter any missing details.
Delete