
Identity proofing (IDP) is a crucial step in enabling healthcare providers to electronically prescribe medications. Through this process, prescribers verify their identity and validate that they have the necessary credentials to prescribe legend and/or controlled substances.
Beginning February 28, 2024, all new providers or providers who have lost access to their existing credentials or otherwise must undergo further identity proofing, must go through Identity Assurance Level 2 (IAL2) identity proofing before any prescriptions are sent.
Providers who began the IDP with ID.me will need to contact Valant Support or their Implementation Manager to have a new invite sent, to go through Experian (InfinID) instead of ID.me for the verification portion.
Video: EPCS Identity Proofing (Experian)
Video: Non-EPCS Identity Proofing (Experian)
The invitation to start identity proofing is sent from DrFirst (DO-NOT-REPLY-EPCS@drfirst.com) to the provider’s email address on file.
- New providers will have the process initiated by a Valant team member after the purchase of a Prescribing license. Go to the "Manage Your Subscription" page if a new prescriber license needs to be added for the practice.
- Existing providers who have lost access to their token should contact support.
To complete Identity Proofing, prescribers will need:
- A smartphone capable of taking a 'selfie'
- A valid driver’s license, state-issued ID, or passport for document upload
- Two-Factor Authentication Token (providers prescribing controlled substances)
- NPI (all providers) numbers
- DEA (providers prescribing controlled substances) numbers
Complete Identity Proofing
Click Enroll now from email invite

This link will opens a page where your NPI # and Invite ID will be pre-populated in the "I have an Invite box" in the lower right hand corner of the page. Confirm that these fields are correct, and click the orange Proceed button.
Accept the Terms of Use and Conditions.
A temporary password will be provided on the next screen. The temporary password will allow you to resume the IDP session if you exit for any reason.
- It is highly recommended to physically write down the temporary password.
- The temporary password can be used only after IDP is passed and a token hasn't been registered.
- If you need to exit the session and complete it later, the temporary password can be used, within 24 hours, to return to where you left off previously.
The next screen lists some pre-requisites for the IDP process:
- Driver's License, Passport, or State ID
- Token: At least one hard or soft token is necessary to proceed
- Smart Phone or tablet with a camera

Complete the demographic data and verify that the pre-populated fields are correct.
Required
- Home Address fields: Enter the address related to your financial records. This is typically a home address. Do not input any special characters within the address field.
- Social Security Number
- Mobile Phone Number
Optional
- Credit Card Number: While this is not required, it is highly recommended as this can increase chances of passing IDP if you fail the first time. Please enter a personal credit card that is either a VISA or Mastercard. You will NOT be charged; Experian requires only the first 8 digits

If Experian cannot validate your information, you may be required to answer 3-4 knowledge-based questions pertaining to your financial history. If Experian can validate your information then your process will continue without the knowledge-based questions.
Based on the information you provided, Experian will determine whether or not you have successfully passed IDP.
Note: If you fail three times, this will lock your account. You cannot attempt IDP again for a full 24 hours.
- If you do not pass, see Why Am I Failing EPCS Identity Proofing?
- If you successfully pass, continue to the next step.
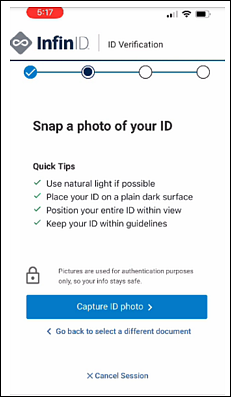
Scan the QR Code on your mobile device for document and photo capture.

After accepting terms of use, select an identifying document, such as a driver's license, passport, or state ID.
 |
 |
Photograph your identifying document (front and back).
 |
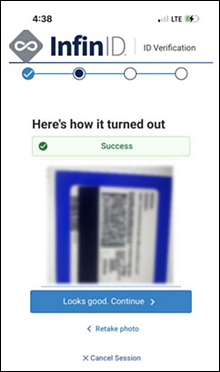 |
Take an image of yourself (“selfie”). It is recommended to take a selfie without glasses.
 |
 |
The application will prompt you to exit from your mobile screen to go back to the identity proofing screen where you scanned the QR code.
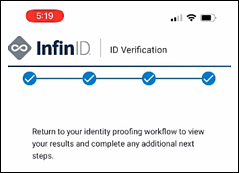
Click Check Status

You will be redirected to a confirmation screen where you will be prompted to add a token. Click the orange Add New Token button to begin.
- It is highly recommended that you add at least two tokens in case one is lost or inaccessible. If you cannot attach two tokens at this step, you can manage tokens later from the EPCS Dashboard.

Select the manufacturer from the Token Manufacturer drop-down menu.
Select SYMANTEC if:
- You are using a soft token (VIP Access App on mobile phone/tablet/computer)
- You are using a keychain hard token that has the Symantec name and logo on the face of the token.
Select ONESPAN if:
- You are using a keychain hard token that has the OneSpan name and logo on the face of the token.
Complete the rest of the fields with the following listed information to be entered per token, then click Save
- Token Issuer: DrFirst
- Token Type: OTP HARD TOKEN (key fob) or OTP SOFT TOKEN (VIP Access app)
- Token Name: Nickname for the token to help identify it (e.g., "iPhone token", "key fob", etc.)
-
Serial Number or Credential ID
- If you are using a SYMANTEC HARD TOKEN (key fob): enter the Serial Number (S/N) on the back of the token without any spaces.
- If you are using a OneSpan HARD TOKEN (key fob): enter the Serial Number (S/N), the long string of numbers on the back of the token without any dashes.
- If you are using a SYMANTEC VIP Access SOFT TOKEN (app): enter the Credential ID that appears at the top of the screen without any spaces.
- One Time Passcode (OTP): The number generated on the hard token or the Security Code from the VIP Access app.
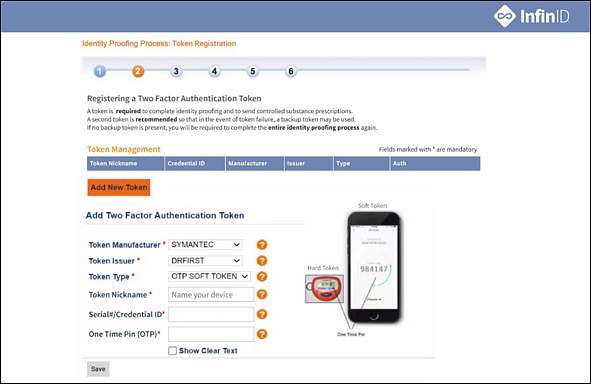
Once all tokens have been added, click Continue
Create a "Passphrase", "Security Question", and "Security Answer", then click Continue. This passphrase will be used to prescribe controlled substances. The security question and answer will be necessary if you ever have to reset or recover your passphrase.
- The passphrase must be at least 8 characters long, be mixed case, and contain at least one number — avoid special characters.
- A security question and security answer (case sensitive) will need to be entered as well. Since it is case sensitive, the security answer must be remembered exactly as it was entered.
Note: The passphrase can only be reset by correctly answering your security question. In the event that the passphrase is forgotten and cannot be reset, your account will be DISABLED, and you will be required to complete IDP again from the beginning.

To complete set up, you are required to submit a verification code. The delivery method of the verification code will be indicated on your screen.
- If your method of delivery is by letter, you must wait to complete your EPCS account setup until after you receive this letter.
Note: The verification code within the text message is only valid for 7 days, and the verification code within the letter is only valid for 30 days.


The confirmation email contains a link that will allow you to enter your verification code.
Note: You should NOT delete the email, as you will need the link in the email to continue the process. Without this email, you may need to restart the whole process again.
Upon clicking the link, you will be prompted to enter your Verification Code. Fill out the required fields, and click Continue.

After you have successfully entered the verification code, you will now be required to complete LAC (Logical Access Control) with a staff admin, before you can send controlled substance prescriptions.
