
The Patient Reminders feature allows users to send automated messages to patients via Email, SMS, and Robocall notification. These reminders operate on a “set it and forget it” system that only requires the practice to activate the rule, and then allow the system to do the work of determining when and to whom a message is sent. The goal is to reduce time spent by the practice manually contacting these patients (Ex: Appointment Reminders).
The Patient Communications permission is required to use this feature.
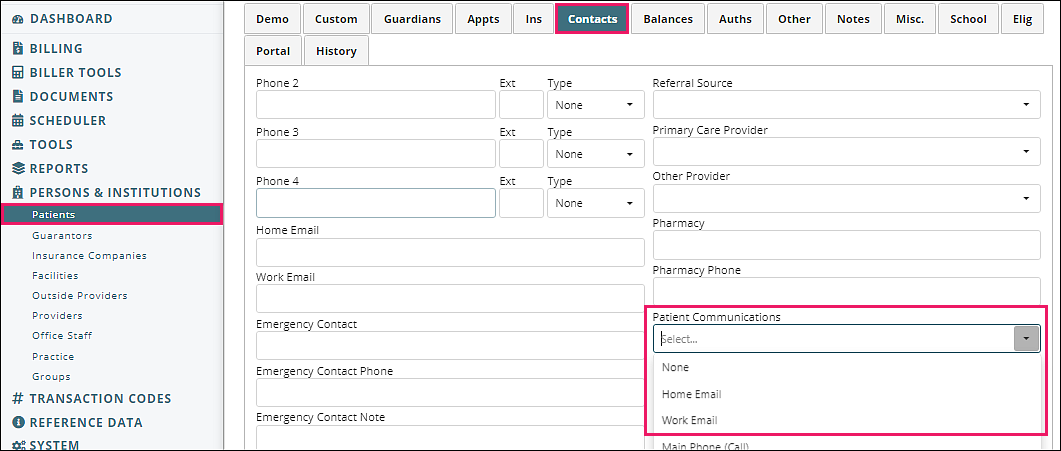
The Patient must have the Patient Communications field populated in Persons & Institutions | Patients | select Patient | Contacts tab for successful delivery.
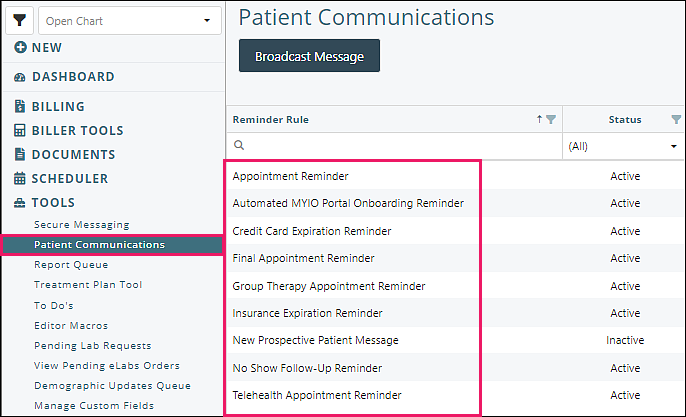
There are several types of reminders in the Patient Communications link found under Tools in the left navigation menu.
Timing of Delivery
When ACTIVATE REMINDER is checked, the reminders will begin delivery the following day. Exceptions are the Final Appointment Reminder, New Prospective Patient Message, and No Show Follow-Up Reminder which will begin delivery ten minutes from activation.
The #NextAppointmentTime displayed to the patient in the Appointment Reminder, Final Appointment Reminder, Group Therapy Appointment Reminder, and Telehealth Appointment Reminder will correspond to the Patient Time Zone field in Persons & Institutions | Patients | select patient | Demo tab.
Click on a reminder title to see details.
Appointment Reminder
- Click Appointment Reminder
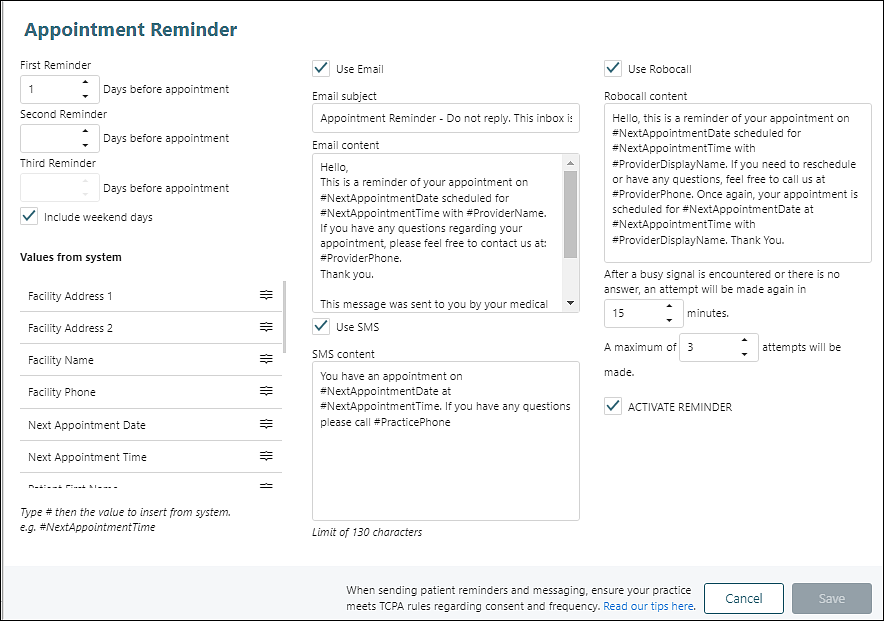
- Select number of days in First Reminder, Second Reminder, Third Reminder options
- Check “Use Email”, “Use SMS”, and/or “Use Robocall”
- Optional to customize “Email subject”, “Email content”, “Robocall content”, “SMS content” by either typing # then the value to insert “Values from system”, or dragging from “Values from system” to text box(es)
- Enter desired minutes and attempts for Robocall delivery
- Check “ACTIVATE REMINDER” checkbox
- Click Save
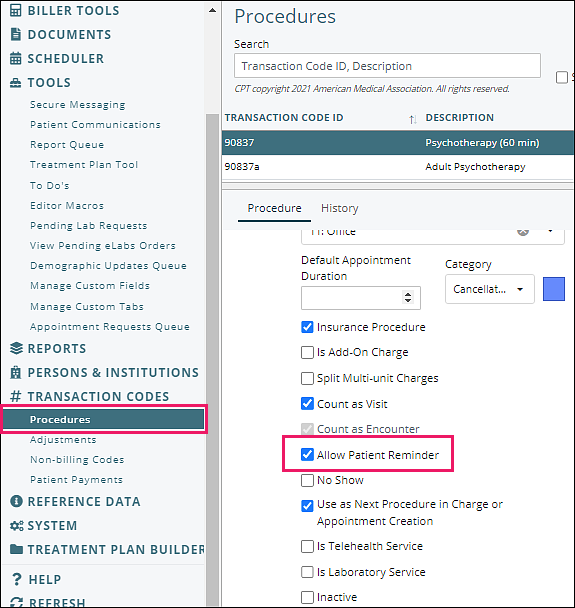
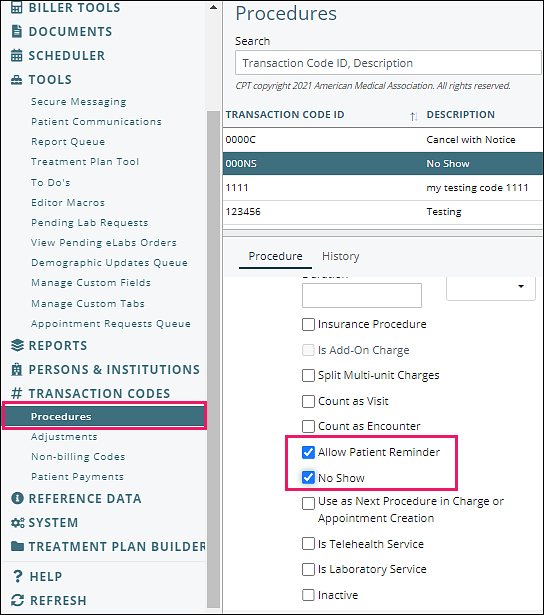
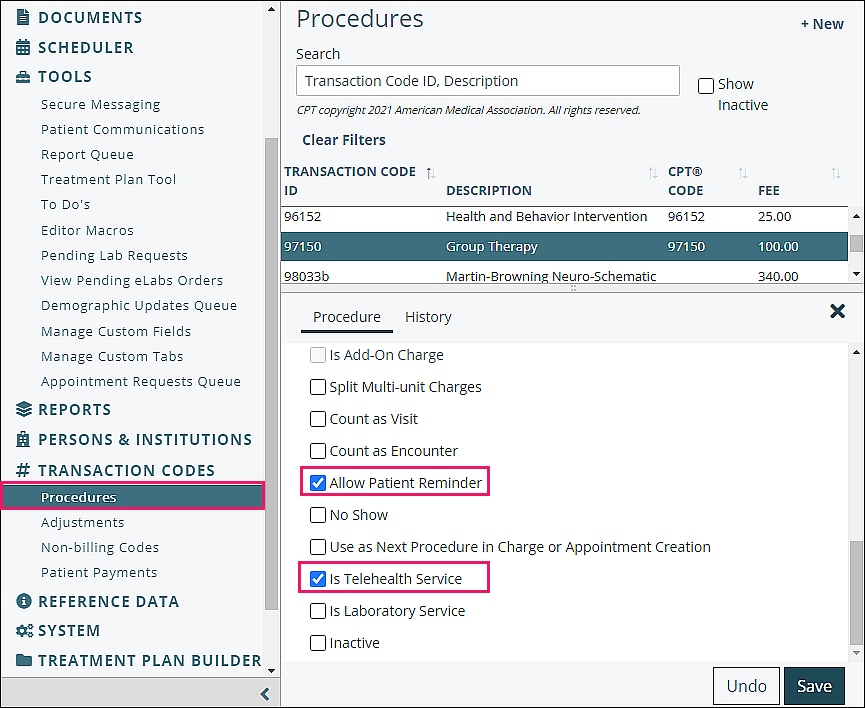
To ensure reminders are sent, check box in Procedure code “Allow Patient Reminder”
Automated MYIO Portal Onboarding Reminder
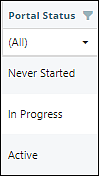
With the Automated MYIO Portal Onboarding Reminders, practices can set up automatic messages that will go out to all patients who need to activate their MYIO accounts. The messages will be sent to all who do not have "Active" in the "Portal Status" column in Persons & Institutions | Patients.
- Click Automated MYIO Portal Onboarding Reminder
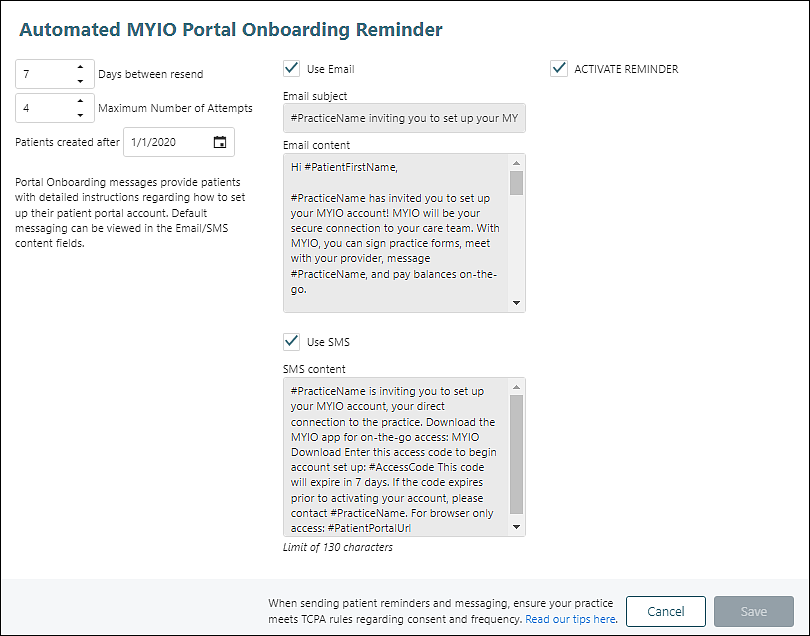
- Select number of days and attempts in “Days between resend” and number of "Maximum Number of Attempts" options
- Verify or update date in "Patients created after" field
- Check “ACTIVATE REMINDER” checkbox
- Click Save
The "Status Details" column in Persons & Institutions | Patients will show the most recent date the message has been sent.

Note: Message fields are not editable to ensure patients receive accurate and complete information to set up their accounts. Only SMS and email options are available with this reminder.
DeleteCredit Card Expiration Reminder
With the expiration reminders, practices can set up automatic messages that will go out to patients who need to update credit card information.
- Click Credit Card Expiration Reminder
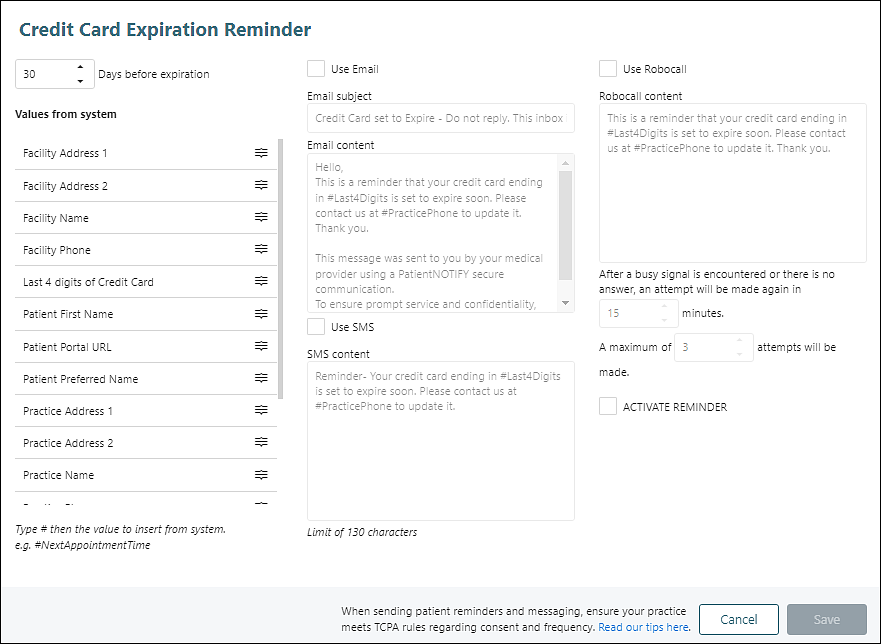
- Select number of days in "Days before expiration” option
- Check “Use Email”, “Use SMS”, and/or “Use Robocall”
- Optional to customize “Email subject”, “Email content”, “Robocall content”, “SMS content” by either typing # then the value to insert “Values from system”, or dragging from “Values from system” to text box(es)
- Enter desired minutes and attempts for Robocall delivery
- Check “ACTIVATE REMINDER” checkbox
- Click Save
Note: Credit Card Expiration Reminder will only work if the practice is signed up for Valant’s Integrated Credit Card Processing solution.
DeleteFinal Appointment Reminder
- Click Final Appointment Reminder
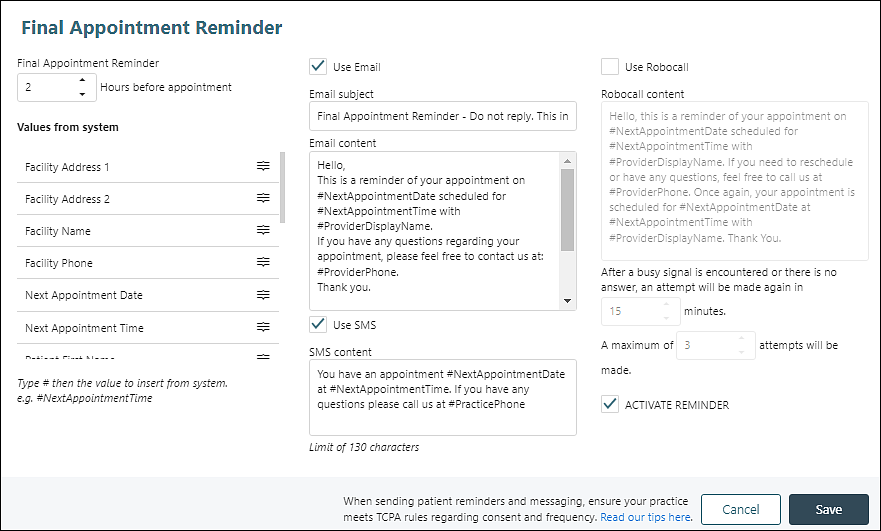
- Select number of hours in “Hours before appointment” field
- Check “Use Email”, “Use SMS”, and/or “Use Robocall”
- Optional to customize “Email subject”, “Email content”, “Robocall content”, “SMS content” by either typing # then the value to insert “Values from system”, or dragging from “Values from system” to text box(es)
- Enter desired minutes and attempts for Robocall delivery
- Check “ACTIVATE REMINDER” checkbox
- Click Save
To ensure reminders are sent, check box in Procedure code “Allow Patient Reminder”

Group Therapy Appointment Reminder
- Click Group Therapy Appointment Reminder
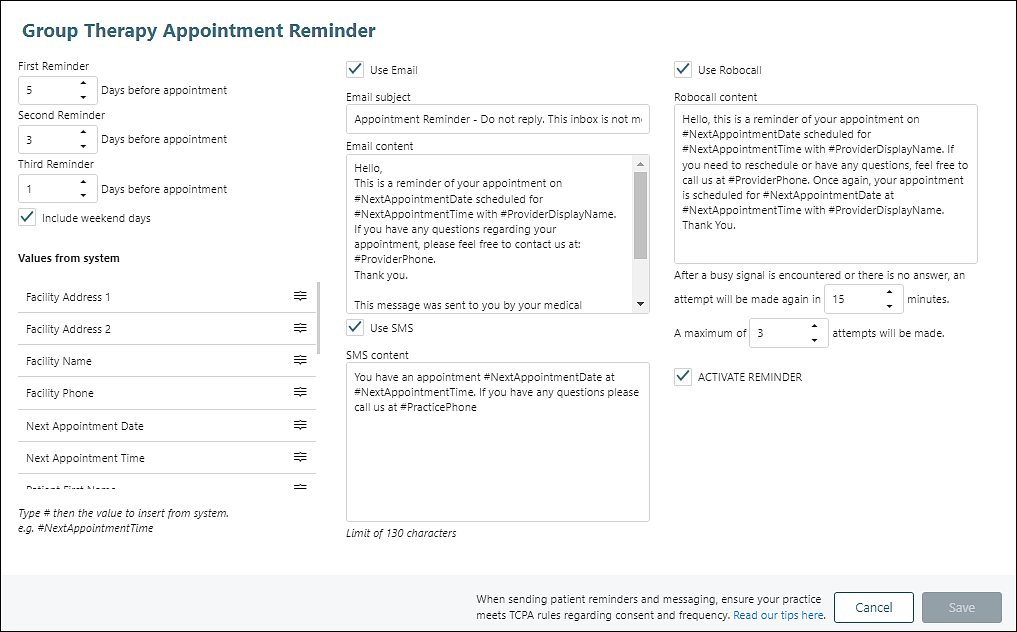
- Select number of days in First Reminder, Second Reminder, Third Reminder options
- Check “Use Email”, “Use SMS”, and/or “Use Robocall”
- Optional to customize “Email subject”, “Email content”, “Robocall content”, “SMS content” by either typing # then the value to insert “Values from system”, or dragging from “Values from system” to text box(es)
- Enter desired minutes and attempts for Robocall delivery
- Check “ACTIVATE REMINDER” checkbox
- Click Save
Note: Group Therapy Appointment reminders will be sent instead of the appointment reminder, so the patient will not receive two messages for the same appointment.
DeleteInsurance Expiration Reminder
With the expiration reminders, practices can set up automatic messages that will go out to patients who need to update insurance information.
- Click Insurance Expiration Reminder
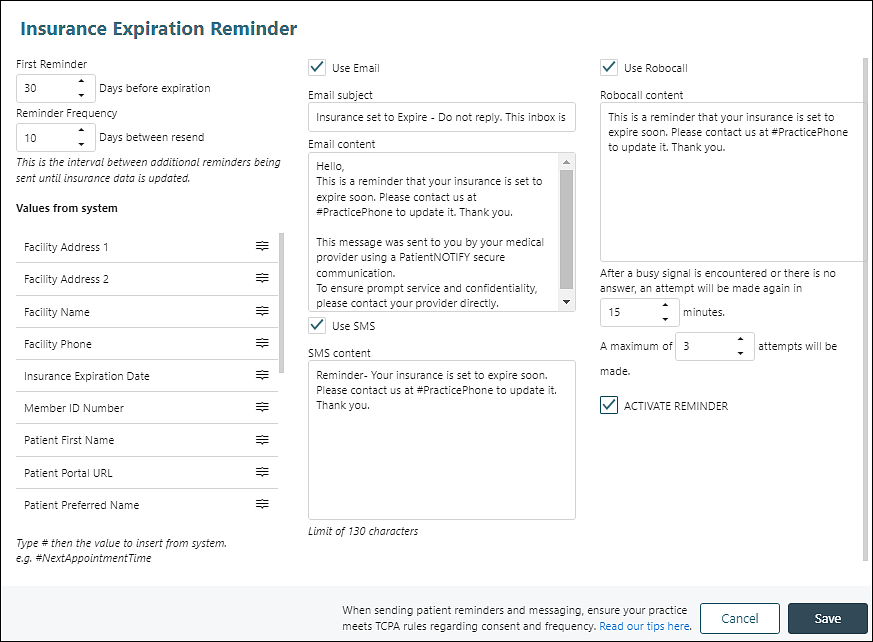
- Select number of days in "Days before expiration” and “Days between resend” options
- Check “Use Email”, “Use SMS”, and/or “Use Robocall”
- Optional to customize “Email subject”, “Email content”, “Robocall content”, “SMS content” by either typing # then the value to insert “Values from system”, or dragging from “Values from system” to text box(es)
- Enter desired minutes and attempts for Robocall delivery
- Check “ACTIVATE REMINDER” checkbox
- Click Save
New Prospective Patient Message
If activated, this message is delivered to all prospective patients when they submit the form to the practice. Prospective Patients will receive messages via the method(s) they selected as their "Contact Preference" in the prospective patient forms.
- Click New Prospective Patient Message
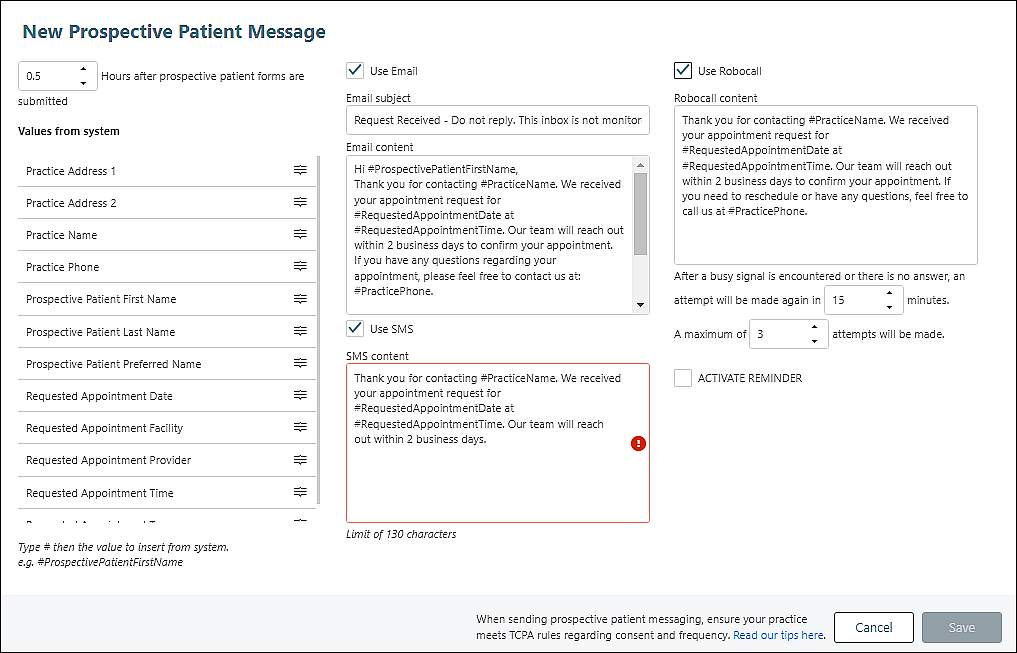
- Select number of hours (may enter less than an hour using decimal - see example) in "Hours after prospective patient forms are submitted” option
- Check “Use Email”, “Use SMS”, and/or “Use Robocall”
- Optional to customize “Email subject”, “Email content”, “Robocall content”, “SMS content” by either typing # then the value to insert “Values from system”, or dragging from “Values from system” to text box(es)
- Enter desired minutes and attempts for Robocall delivery
- Check “ACTIVATE REMINDER” checkbox
- Click Save
No Show Follow-Up Reminder
To allow a no show follow-up, the appointment needs to be updated with a procedure/transaction code that has the boxes checked for "No Show" and "Allow Patient Reminder".
- Click No Show Follow-Up Reminder
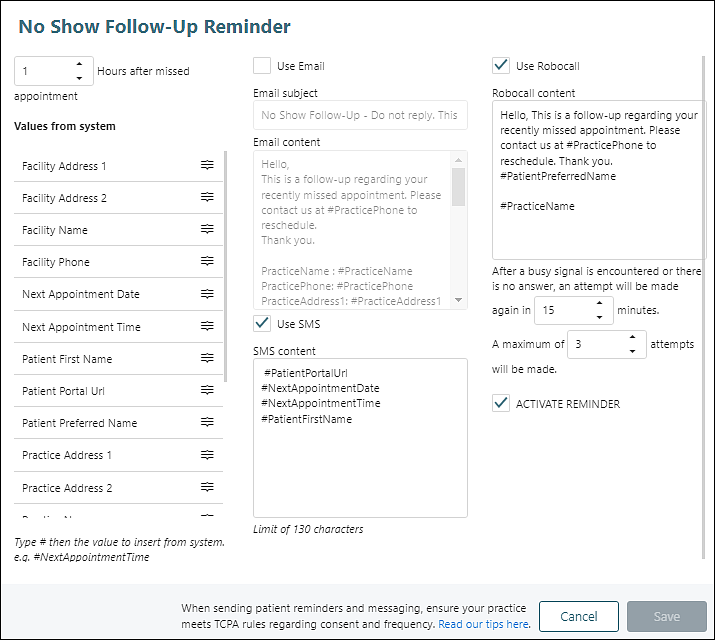
- Select number of hours in "Hours after missed” option
- Check “Use Email”, “Use SMS”, and/or “Use Robocall”
- Optional to customize “Email subject”, “Email content”, “Robocall content”, “SMS content” by either typing # then the value to insert “Values from system”, or dragging from “Values from system” to text box(es)
- Enter desired minutes and attempts for Robocall delivery
- Check “ACTIVATE REMINDER” checkbox
- Click Save
Note: A procedure designated as "No Show" should be updated to the appointment to trigger the no show reminder. The timing of the reminder is based on the appointment time, not the time the procedure is updated to "No Show".
To ensure reminders are sent, check boxes in Procedure code “Allow Patient Reminder” and "No Show"
Telehealth Appointment Reminder
- Click Telehealth Appointment Reminder
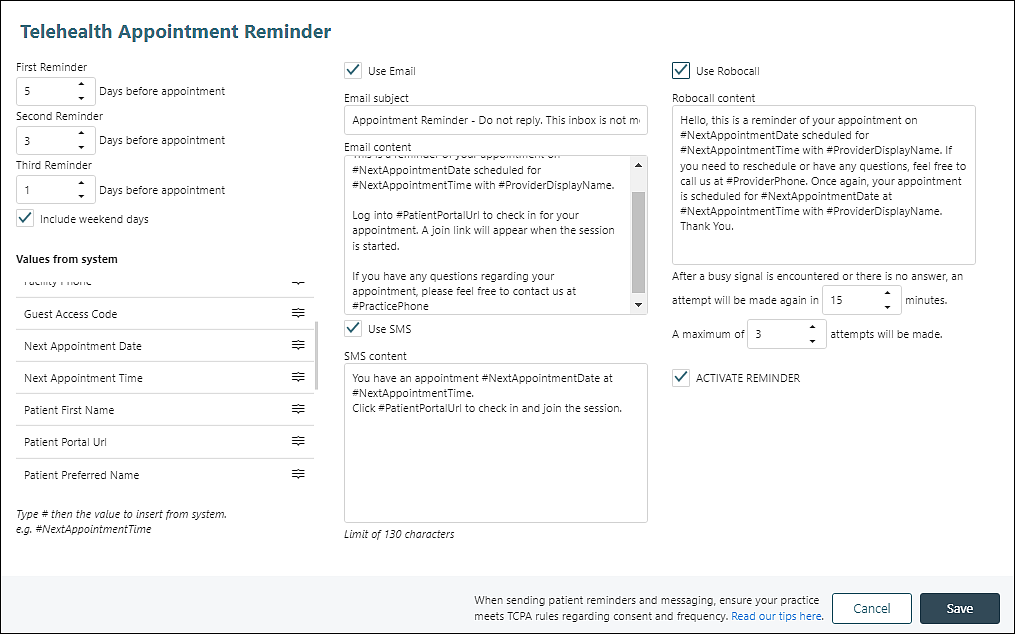
- Select number of days in First Reminder, Second Reminder, Third Reminder options
- Check “Use Email”, “Use SMS”, and/or “Use Robocall”
- Optional to customize “Email subject”, “Email content”, “Robocall content”, “SMS content” by either typing # then the value to insert “Values from system”, or dragging from “Values from system” to text box(es) - include #PatientPortalUrl to assist patients joining through MYIO
- Enter desired minutes and attempts for Robocall delivery
- Check “ACTIVATE REMINDER” checkbox
- Click Save
Note: Telehealth reminders, if configured properly in the transaction code settings, will be sent instead of the appointment reminder, so the patient will not receive two messages for the same appointment.
To ensure reminders are sent, check boxes in Procedure code “Allow Patient Reminder” and "Is Telehealth Service"
Note: For any reminder to be active, the Activate Reminder box needs to be checked, and at least one of the three communication methods (Email, Robocall, SMS) must be selected.